# Start here

Welcome to the Wavecast knowledgebase.

What do you need to do?

<table data-view="cards"><thead><tr><th></th><th></th><th></th><th data-hidden data-card-target data-type="content-ref"></th></tr></thead><tbody><tr><td>Run an event</td><td></td><td></td><td><a href="/pages/WmGXZeK3APfD7C6oo6u9">/pages/WmGXZeK3APfD7C6oo6u9</a></td></tr><tr><td>Publish content</td><td></td><td></td><td><a href="/pages/cMVEl36vvGMduUi0F7Bs">/pages/cMVEl36vvGMduUi0F7Bs</a></td></tr><tr><td>Analyse performance</td><td></td><td></td><td><a href="/pages/1fXYzFIgaOl6EyVgsTYy">/pages/1fXYzFIgaOl6EyVgsTYy</a></td></tr><tr><td>Send an email campaign</td><td></td><td></td><td><a href="/pages/UHITQnHnxR40j5Ywo3Az">/pages/UHITQnHnxR40j5Ywo3Az</a></td></tr><tr><td>Engage an audience</td><td></td><td></td><td><a href="/pages/ZHwj0aO1f9dS7s6RAn0I">/pages/ZHwj0aO1f9dS7s6RAn0I</a></td></tr><tr><td>Configure my hub</td><td></td><td></td><td><a href="/pages/ZmDcXinLzIiK89PtPsns">/pages/ZmDcXinLzIiK89PtPsns</a></td></tr></tbody></table>

## Contact support

Need support? Get in touch.

{% tabs %}
{% tab title="Email" %}
[Send us an email](https://share-eu1.hsforms.com/1NBSPTqBQTdCAwh8yx5_Lbgfrf4o).&#x20;
{% endtab %}

{% tab title="Chat" %}
Start a webchat. Go to [publish.wavecast.io](https://publish.wavecast.io) and select the :speech\_balloon:icon in the bottom left.&#x20;
{% endtab %}

{% tab title="Phone" %}
Call +44 203 772 0504 to speak to a member of the team.&#x20;
{% endtab %}
{% endtabs %}


# Getting started

An introduction to the basics of how events are structured on Wavecast.

**Events gives organisers ultimate flexibility over the promotion, registration, management and broadcast of their event calendars. The following guide explains how to get started with your first event, clone it for future events and then more advanced configuration.**

## Getting to know the basics.&#x20;

Events come in all shapes and sizes. Before you get started, it's important to understand how events are classified on Wavecast, in order to support the widest variety:

### Event types

Your event type determines the configuration of your event website, registration and analytics.&#x20;

Think about the programme for your event in the following terms:&#x20;

1. **Single Session**: An event where all the content happens in just one session. For example, a webinar.&#x20;
2. **Multi-Session**: A series of back-to-back sessions that follow on from each other, one after the other. For example, a one-day conference.&#x20;
3. **Super Event**: An event with concurrent or parallel sessions, or containing different start and end times. For example, a multi-day conference or a conference with multiple tracks.

### Attendance types&#x20;

The attendance type defines the audience experience.&#x20;

Note that the attendance type relates to the location of the **audience**, not the speakers.&#x20;

* **Remote**: The live audience is entirely online.&#x20;
* **Hybrid**: The live audience is a combination of in-person and online.&#x20;
* **In-person**: The live audience is entirely in-person and there is no option to watch online.

For example, an online audience watching a broadcast of speakers sitting together in a studio is *Remote*.&#x20;

Meanwhile, an audience sitting together watching a speaker who is being broadcast into a venue is *In-person*.&#x20;

### Format

The event format specifies the interaction between the speakers and the audience.&#x20;

* **Broadcast**: A format where just the speakers contribute content to the event. Also known as a one-to-many format because speaker(s) are the only ones on screen.&#x20;
* **Meeting**: Both participants and speakers are able to contribute on screen. This is known as a many-to-many format.&#x20;
* **Mixed**: An event that combines both of the above formats. For example, a speaker contribution followed by audience participation.


# Setup your first event

How to configure your first Single Session, Multi-Session or Super Event on Wavecast.

## Introduction

Now the basics are covered, it's time to get your first event setup just the way you want it.&#x20;

Follow the step-by-step guide for the [event type](/events/getting-started#event-types) you need.&#x20;

Any event, once created, can be used as a template and cloned quickly. This allows you to duplicate an event that has the same setup in a few clicks.

### Creating your first Single Session Event

{% embed url="<https://scribehow.com/shared/Creating_your_first_single_session_webinar__XeHTexg5T6GzkjlQg3mbAg>" %}

### Creating your first Multi-Session Event

{% embed url="<https://scribehow.com/shared/Creating_your_first_multi-session_event__jqrGhUcfS1ulAokOsPzS3g>" %}

### Creating your first Super Event

{% embed url="<https://scribehow.com/shared/Creating_your_first_super_event__0uEPXuO8RQiAjlVIW0NXYA>" %}


# Copy an existing event

## Introduction

It's a quick and easy to duplicate an event, ensuring consistency with how multiple events are configured.

The step-by-step guide below explains how to use the Clone feature.&#x20;

Following this process allows you to maintain consistency with your event configuration as well as save time getting your event setup.

## Create a new event from an existing one

{% embed url="<https://scribehow.com/shared/Clone_an_event__WtxKvIn9Rw2FUuQgUT3CNw>" %}


# Publish an event

## Introduction

Now you've [setup your event](/events/setup-your-first-event), it's time to make it visible across the hub.&#x20;

Events can be listed in different places to help audiences discover them, including:&#x20;

* in event listings&#x20;
* alongside related content&#x20;
* on channels&#x20;

Let's go through each in turn.

## Event listings

An event listing is a calendar of events that have been created on a hub.&#x20;

Listings are an important destination for an audience to search, discover and engage with events on a hub.&#x20;

The following step-by-step guides show how to:

* show/hide an event in calendar listings
* configure how events appear in listings&#x20;
* manage redirects

### Show/hide an event in calendar listings

{% embed url="<https://scribehow.com/shared/Showhide_an_event_in_calendar_listings__ezkmfaJpTHujKgCbqHJJrQ>" %}

### Configure how events appear in listings

By default, the event summary is displayed in the listing. &#x20;

To show alternative text, listing variants can be used instead to customise what message is shown.&#x20;

&#x20;

{% embed url="<https://scribehow.com/shared/Configure_how_events_appear_in_listings__o1hULpnsQsK-3Y1iPkZEyQ>" %}

### Redirect an event to another page or URL

It is possible to maintain a central calendar even when event information is hosted externally by setting up an event redirect.&#x20;

It is not necessary to follow these steps for events that are delivered on Zoom or ON24 via an integration.&#x20;

{% embed url="<https://scribehow.com/shared/Redirect_an_event_to_another_page_or_URL__JaTleAHoT5iAKJH1YWd_fA>" %}

## Alongside related content

Events are just one of the content types that can be published.&#x20;

Adding terms to events is an effective way to organise them into categories, allowing for audiences to filter events within a listing and find events they require. &#x20;

Using a taxonomy to categorise the events is recommended for multi-event hubs. Read more about Publishing.&#x20;

{% embed url="<https://scribehow.com/shared/Create_a_taxonomy_to_categorise_events_andor_content__N2kj5-SESM2IUaqBdHHAXQ>" %}

### On Channel

Channels are landing pages that aggregate events and content around a particular theme. Learn more about Channels.&#x20;

{% embed url="<https://scribehow.com/shared/How_to_assign_Events_to_Channels__oRb_kGHJSQGyNXw38pRt1A>" %}


# Speakers

This guide walks you through the steps to add and manage speakers for your event. You can either select existing speakers from your hubs or create new ones as needed.

### Accessing the Speakers Section

1. **Navigate to the "Overview" Section**
   * From the event dashboard, go to **Overview** > **Speakers**.

<figure><img src="/files/8iOzjyLjYlCijYGihLBu" alt=""><figcaption></figcaption></figure>

1. **Search for Speakers Across Hubs**
   * Use the search bar to find speakers who are already associated with any of your hubs.
   * Browse the results to locate the desired speaker(s).

<figure><img src="/files/lDd8x2JtDL0g8O2nGTiX" alt=""><figcaption></figcaption></figure>

***

### Adding Speakers

#### Option 1: Select Existing Speakers

1. Locate the speaker using the search functionality.
2. Click on the speaker’s name to add them to your event.

#### Option 2: Quick Create a New Speaker

1. If the speaker you’re looking for isn’t listed:
   * Click on the **Quick Create** option.
2. Fill in the basic details for the speaker:
   * Name
   * Title/Role
   * Organization
3. Save the entry to add the speaker to your event.

<figure><img src="/files/qaO1dL3ed3WlU4fuARyO" alt=""><figcaption></figcaption></figure>

***

### Advanced Editing for Speaker Details

1. **Access the Advanced Edit Mode**
   * Open the edit speaker modal for the selected speaker.
   * Click on the **Advanced Edit** button.
2. **Update Additional Details**
   * Provide a wider variety of social media links for the speaker’s profile.
   * Configure how the speaker appears in the listing view.
   * Add other details such as profile picture and bio.
3. **Save Changes**
   * Review the updates and click **Save** to finalize the speaker profile.

<figure><img src="/files/h04wlOE1k6TAX9Bui7eD" alt=""><figcaption></figcaption></figure>

***

### Best Practices for Managing Speakers

* **Centralize Speaker Data:** Use the search functionality to leverage existing speaker profiles and avoid duplication.
* **Complete Profiles:** Ensure all speakers have updated bios, photos, and links to enhance their presence at the event.
* **Test Links:** Verify social media and external links to ensure accuracy.

***

### How to display on frontend

* **Navigate to the "Pages" Section.** &#x20;
  * From the event dashboard, go to Pages > Pages

<figure><img src="/files/apAM9lzy4CKcIvues2yy" alt=""><figcaption></figcaption></figure>

* **For a single session:**
  * Open the **Home Page**.
  * Toggle **Speakers** and select the **Format** in which you wish the speakers to display.

<figure><img src="/files/pIUNXGL4jqPsIiDGWyI1" alt=""><figcaption></figcaption></figure>

* For a multi-session or super-event:
  * Add a dedicated page for sponsors.

<figure><img src="/files/dOoqZujHSn4vTiiesKqZ" alt=""><figcaption></figcaption></figure>

***

Following these steps ensures that your event has a polished and professional lineup of speakers, ready to engage your audience.


# Sponsors

This guide walks you through the steps to add and manage sponsors for your event. You can either select existing sponsors from your hubs or create new ones as needed.

### Accessing the Sponsors Section

1. **Navigate to the "Overview" Section**
   * From the event dashboard, go to **Overview** > **Sponsors**.

<figure><img src="/files/BWU3JSQ9p3OS6QBWZMsH" alt=""><figcaption></figcaption></figure>

1. **Search for Sponsors Across Hubs**
   * Use the search bar to find sponsors who are already associated with any of your hubs.
   * Browse the results to locate the desired sponsor(s).

<figure><img src="/files/pG7Dp3zBsn2prJ2ME6Z9" alt=""><figcaption></figcaption></figure>

***

### Adding Sponsors

#### Option 1: Select Existing Sponsors

1. Locate the sponsor using the search functionality.
2. Click on the sponsor’s name to add them to your event.

#### Option 2: Quick Create a New Sponsor

1. If the sponsor you’re looking for isn’t listed:
   * Click on the **Quick Create** option.
2. Fill in the basic details for the sponsor:
   * Name
   * Category
   * Organization
3. Save the entry to add the sponsor to your event.

<figure><img src="/files/OoTovV6zOyHLgMCCgXDW" alt=""><figcaption></figcaption></figure>

***

### Advanced Editing for Sponsor Details

1. **Access the Advanced Edit Mode**
   * Open the edit sponsor modal for the selected sponsor.
   * Click on the **Advanced Edit** button.
2. **Update Additional Details**
   * Provide a wider variety of social media links for the sponsor’s profile.
   * Configure how the sponsor appears in the listing view.
   * Add other details such as logos and descriptions.
3. **Save Changes**
   * Review the updates and click **Save** to finalize the sponsor profile.

<figure><img src="/files/b4QhnE4ZP8fjLlmNMGH0" alt=""><figcaption></figcaption></figure>

***

### Best Practices for Managing Sponsors

* **Centralize Sponsor Data:** Use the search functionality to leverage existing sponsor profiles and avoid duplication.
* **Complete Profiles:** Ensure all sponsors have updated descriptions, logos, and links to enhance their presence at the event.
* **Test Links:** Verify social media and external links to ensure accuracy.

***

### How to display on frontend

* **Navigate to the "Pages" Section.** &#x20;
  * From the event dashboard, go to Pages > Pages

<figure><img src="/files/igwK5XQLwb6husm6uvNF" alt=""><figcaption></figcaption></figure>

* For a single session:
  * Open the **Home Page**.
  * Toggle **Sponsors** and enable **Show Sponsors in Sidebar**.

<figure><img src="/files/Fggk61Q1mdvvNBfxYmGG" alt=""><figcaption></figcaption></figure>

* For a multi-session or super-event:
  * Add a dedicated page for sponsors.

<figure><img src="/files/cW2ZzEOkC7iQK8MGCUfg" alt=""><figcaption></figcaption></figure>

***

Following these steps ensures that your event has a polished and professional lineup of sponsors, ready to support your event's success.


# Resources

This guide walks you through the steps to add and manage resources for your event. You can either select existing resources from your hubs or create new ones as needed.

Accessing the Resources Section

1. **Navigate to the "Overview" Section**
   * From the event dashboard, go to **Overview** > **Content**.

<figure><img src="/files/M7t4aXymxxRvXAYrD3zr" alt=""><figcaption></figcaption></figure>

1. **Search for Content in your Hub**

<figure><img src="/files/p91ifbx22oaP81TAsDDf" alt=""><figcaption></figcaption></figure>

***

### Adding Content

#### Option 1: Select Existing Content

1. Locate the content using the search functionality.
2. Click on the content's title to add them to your event.

#### Option 2: Quick Create a New Content

1. If the piece of content you’re looking for isn’t listed:
   * Click on the **Quick Create** option.
2. Fill in the basic details for the content. You can currently only add two types:
   * Article
   * Document
3. Save the entry to add the content to your event.

<figure><img src="/files/fmdBss9jYbr01F36624q" alt=""><figcaption></figcaption></figure>

***

### Advanced Editing of Content

1. **Access the Advanced Edit Mode**
   * Open the edit content modal for the selected piece of content.
   * Click on the **Advanced Edit** button.
2. **Update Additional Details**
   * Configure how the content appears.
   * Add other details such as access settings.
3. **Save Changes**
   * Review the updates and click **Save** to finalize the content.

<figure><img src="/files/N1HfSURsyq0qLc8W7G05" alt=""><figcaption></figcaption></figure>

***

### Best Practices for Managing Content

* **Centralize Content Data:** Use the search functionality to leverage existing pieces of content and avoid duplication.
* **Test Links:** Verify social media and external links to ensure accuracy.

***

### How to display on frontend

* **Navigate to the "Pages" Section.** &#x20;
  * From the event dashboard, go to Pages > Pages

<figure><img src="/files/igwK5XQLwb6husm6uvNF" alt=""><figcaption></figcaption></figure>

* For a single session:
  * Open the **Home Page**.
  * Toggle **Resources** and toggle **Enable**.

<figure><img src="/files/HmhywvZIfoX73PaVviaY" alt=""><figcaption></figcaption></figure>

* For a multi-session or super-event:
  * Add a dedicated page for resources.

<figure><img src="/files/Q2BjNTg4oRGUdI6RgcI4" alt=""><figcaption></figcaption></figure>

***

Following these steps ensures that your event has a polished and professional lineup of sponsors, ready to support your event's success.


# Testimonials

This guide walks you through the steps to add and manage testimonails for your event and how to assign company and/or user profiles.

Accessing the Resources Section

1. **Navigate to the "Testimonials" Section**
   * From the event dashboard, go to **Overview** > **Testimonials**.

<figure><img src="/files/2a5jeTI7RjIGJNykwxmt" alt=""><figcaption></figcaption></figure>

***

### Adding Testimonials

1. Click on **Create**
2. Fill out all the relevant information

<figure><img src="/files/vgqHlqUSWsLsKlzD1WYZ" alt=""><figcaption></figcaption></figure>

Please note that if you select User or Speaker under the dropdown option, you can select a pre-existing profile or quick create a new one!

***

### How to display on frontend

To display this on the frontend, use the following shortcode:

`[featured_testimonials event_id="???"]`

Please note, that if you are using the shortcode in the context of the event, the event\_id parameter is optional.


# Copy

Coming soon!


# Agendas

Our platform offers three types of agendas for creating engaging and data-rich schedules for your events. Below, we outline each agenda type and provide guidance on their setup and functionality:

<figure><img src="/files/fHSCpzaQa4g44dLucfeb" alt=""><figcaption></figcaption></figure>

### Building Agendas

Our platform offers three types of agendas for creating engaging and data-rich schedules for your events. Below, we outline each agenda type and provide guidance on their setup and functionality:

**1. HTML Agenda**

* **Overview**: The HTML agenda option allows you to paste custom HTML to create a fully customized agenda layout. This is ideal for users who need complete control over the design and structure of their event schedule.
* **How to Use**: Simply paste your HTML code into the editor and preview to ensure everything displays as expected.

**2. Basic Agenda**

* **Overview**: The Basic agenda is a quick and user-friendly way to add sessions and segments. This type is particularly effective for analyzing the impact of live delivery.
* **Features**:
  * Add sessions and segments easily.&#x20;
  * Configure your on-demands directly from the agenda.
  * Gain insights into event performance through segment data.

**3. Advanced Agenda**

* **Overview**: The Advanced agenda enables you to create a more visually engaging schedule by placing agenda segments side-by-side. Additionally, you can configure custom colors to enhance the appearance of your agenda.
* **When to Use**: Use the Advanced agenda for complex event schedules or multi-track conferences requiring a highly customized and visually dynamic layout.
* **Limitations**: Cannot configure sessions directly from this agenda. Sessions must be created before the advanced agenda is built and linked that way.

***

### Basic Agenda

#### Add sessions and segments easily:

{% embed url="<https://scribehow.com/embed/Agenda_Segments_to_Sessions__lOuXbh_cQWyJpx83VYS1_Q>" %}

#### Deleting linked sessions:

{% embed url="<https://scribehow.com/embed/Delete_Linked_Session_on_Agenda__VI-SER8SQmyCM9VtVM-fRQ>" %}

#### Gain insights into event performance through segment/session data:

[Please read this documentation](/analytics/engagement-report)

***

### Advanced Agenda

{% embed url="<https://scribehow.com/embed/Creating_an_Advanced_Agenda__YE4IPsD3QMGmYYsDipAAvg>" %}

{% hint style="danger" %}
Cannot configure sessions directly from this agenda. Sessions must be created before the advanced agenda is built and linked that way.
{% endhint %}

***

### Adding Agendas to Event Pages

Once you’ve built your agenda, you can add it to your event pages:

1. Navigate to **Pages** > **Create Page** > **Agenda**.
2. The agenda will be automatically added to your page.
3. Customize settings, including **displayed tabs**, if using the Basic agenda. Displayed tabs are particularly useful for super-events or events spanning multiple tracks or days.

{% embed url="<https://scribehow.com/embed/Create_Event_Agenda_Page__gYaXt4VoQc-Ly6EmROYbQw>" %}


# Create content

**Great content is an essential pillar to live events. Wavecast's native digital publishing capabilities help take live content to another dimension.**&#x20;

**This guide explains more about the publishing features of Wavecast, including how to create, categorise and manage content.**&#x20;

**By the end you will know how to create articles, share slide decks, publish video and make resources downloadable alongside your live event programme.**

## Getting to know the basics.

### Content Types&#x20;

All content published on your hub can be viewed by navigating to Content.&#x20;

To get started, select Create Content and choose the type you wish to publish.&#x20;

The following types of content can be created on your hub:&#x20;

* Video&#x20;
* Article&#x20;
* Document&#x20;
* Podcast&#x20;
* Survey&#x20;
* Infographic&#x20;
* Case&#x20;
* Study&#x20;
* Report

### Taxonomies

A taxonomy is a group of terms that allow for simple classification.&#x20;

Wavecast supports multiple taxonomies that can be used to [categorise events and content](/publishing/classify-and-personalise/create-and-configure-taxonomies), providing a universal way to organise your live and published content.&#x20;

Once tagged, content can be easily surfaced across the hub within shortcodes. This improves discoverability of your content and personalises the site experience based on user interests.

Shortcodes

Shortcodes are simple and configurable references to more complex objects such as widgets, content and pages. You can to do nifty things with very little effort.

### Additional Fields

The user can be prompted to complete additional fields when accessing the item or to complete a checkbox, such as to [accept terms and conditions or acknowledge a privacy policy](/publishing/control-access/managing-opt-ins).


# Creating an Article

Use this guide to create and publish a new article on the Wavecast platform.

### Getting started

From the sidebar menu, click **Content**, then select **+ Create Content > Create Article**.

***

### Article fields

Fill in the following details:

* **Title** — The article's title as it will appear on the platform.
* **Excerpt** — A short summary of the article.
* **Body** — The full article content.
* **Reading time** — Optional. An estimated reading time for the article.
* **Featured image** — A header image for the article. We recommend using a dark image, as the header copy is white.
* **Permissions** — Set to **Guest**.
* **Taxonomies** — Select relevant terms under **Topics** and **Companies** where applicable.

***

### Publication status

The default status is **Published**. If you are not ready to publish, change the status to **Draft** before saving. Update to **Published** when you are ready to go live.

***

### Saving

Click **Update Article** to save your changes.


# Control access

### Access Controls

You can configure how the audience is able to access the content item:&#x20;

* **Guest**: The content item is public and accessible by all. Analytics are anonymous. Supported on all content types.&#x20;
* **Account**: Audience members will need to have an account on the hub to access. You are able to see the list of users that have accessed the content. Supported on all content types.&#x20;
* **Subscription**: Access is conditional on being registered for a specific event or channel. Use this option when you wish to provide exclusive access to content based on another event or channel subscription. Only available on articles, videos and documents.&#x20;

The default access setting is Guest.&#x20;


# Adding Tickets, Passes & Guest Passes

## Adding Tickets, Passes & Guest Passes

For events that require a subscription, organisers have the option to further customise the registration process by enabling **Require tickets**. These options determine the means by which users gain access to an event.&#x20;

| Ticket     | Payment is required to gain access to the event.                                             |
| ---------- | -------------------------------------------------------------------------------------------- |
| Pass       | Access is granted on a complimentary basis and/or requires approval by an organiser.         |
| Guest Pass | Passes are offered by individuals and companies associated with the event, such as sponsors. |

## **Adding Tickets/Passes**

1. In the event **Overview** tab, specify whether the event will be Online, Hybrid or In-Person. This will allow you configure ticket options for all the available attendance methods, as shown in the image (ie. online or in-person or both).\
   ![](https://s3.amazonaws.com/helpscout.net/docs/assets/547370c3e4b07e8a335a1a8b/images/621f5f9c2ce7ed0fb0911145/file-EZWmPzVL0S.png)
2. In the event **Overview** tab, specify whether the event will be Online, Hybrid or In-Person. This will allow you configure ticket options
3. Navigate to the **Access** tab and enable the following features:

   ```
   	<ul>
   		<li>Subscription</li>
   		<li>Allow subscription</li>
   		<li>Requires ticket</li>
   	</ul>
   </li>
   <li>Click on <strong>Create Option</strong> and enter your ticket/pass details. Remember that hybrid events can support different ticket options for each attendance method. Furthermore, you&#39;ll have to replicate the tickets again if your event is in a dual language. &nbsp;</li>
   ```

| Ticket | Payment is required to gain access to the event.                                                                       |
| ------ | ---------------------------------------------------------------------------------------------------------------------- |
| Pass   | Access is granted on a complimentary basis, requires approval by an organiser and/or is valid for use as a guest pass. |

#### Configure payment service

When creating a new  **Ticket**, you will be asked to specify which payment service will be used. Enter the URL where the user will be redirected for payment to be taken, or [connect your Stripe account](/integrations/payments).&#x20;

#### About success actions

Ticket prices cannot be edited once the ticket has been saved, however, discounts can Gatekeeper controls give you the final say on who is granted access to your event before an attendee's registration is confirmed. These can be set for tickets or passes in any attendance method.&#x20;

Gatekeeper controls give you the final say on who is granted access to your event before an attendee's registration is confirmed. These can be set for ticket **On Success Action**

| Subscribe                   | The user is registered to the event on successful completion of the process.                                                                                                                                                                                                                                                                                                                                                       |
| --------------------------- | ---------------------------------------------------------------------------------------------------------------------------------------------------------------------------------------------------------------------------------------------------------------------------------------------------------------------------------------------------------------------------------------------------------------------------------- |
| Create registration request | The status of registration is set to pending, subject to approval or decline by an admin. You may review and activate approval process emails to keep the user informed about their registration status. Read more about how to approve/decline a registration request.  The status of registration is set to pending, subject to approval or decline by an admin. You may review and activate approval process emails to keep the |

<br>

#### **Setting pre-conditions**

**Pre-conditions allow the event organiser to personalise the user journey for different groups of individuals. For example, you may have an exclusive attendance option for a group of VIPs that you only want them to see. You can also restrict access, based on a list of individuals or email domains - such as a company town hall event. Use the toggle to show or hide a ticket/pass from a non-eligible user. When enabled, the ticket option will only be displayed to those that meet the criteria specified.**&#x20;

## **Adding Guest Passes**

**Pre-conditions allow the event organiser to personalise the user journey for different groups of individuals. For example, you may have exclusive Guest passes that allow users to track and manage invitees to an event.**&#x20;

**This feature can only be used on events where:**

1. **a pass has already been created; and**
2. **the pre-condition of Has Guest Pass is selected.**&#x20;

**To entitle a user to manage guest passes, you first need to define relationships between users, company profiles and events.**&#x20;

1. **Create a company profile**
2. **Assign the sponsors’ contacts to the company profile**
3. **Navigate to Events and select an event**
4. **On the Overview tab, select the sponsor of the event**

<figure><img src="https://lh6.googleusercontent.com/p2f_BIa9pnq8tHRLodUYgJwu4moVuOU15L3SinIeDa3XwVQfMCmKfmmDmnzlB0oqBgyTJqaKQdjgnc4E_A4QAWHk1GqOap1uIzZgLe6B-xua46lYvI5sJtKoCOWk1UBx04RWQRM6" alt=""><figcaption><p><strong>Image 1: Sponsors are assigned to an event.</strong> </p></figcaption></figure>

**5. Specify a maximum guest pass allowance by entering a quota.**&#x20;

#### **Create an event guest list**

**Users that are eligible to receive complimentary guest passes can be managed from within the event settings:**&#x20;

1. **Within the event settings, navigate to Audience**&#x20;
2. **Select Lists.**&#x20;
3. **Create a new list > select Type > Guest Pass.**&#x20;

**Note that only one guest pass list can be created in an event.**&#x20;

#### **Add users to the guest pass list**

**Users can be added to the guest list in batches (Image 2) according to the sponsor and contact that is offering the pass.**&#x20;

<figure><img src="https://lh6.googleusercontent.com/Rkxoy96BVAKbFqzO6htdervXUUe5SVMCNiVZHjFqUIsoZP6BFCcgEtDQ-lFbnE_uGuqnyrKWKA6sRw_DlWzgZlMYASGjadqqoICyuZ_CeP0ssv09T4d7GDN0ay1kSTsbdxIoqRRW" alt=""><figcaption><p><em><strong>Image 2: Batches of guests can be added to a list and assigned to the contact/company offering the pass as well as the pass they’re entitled to.</strong></em></p></figcaption></figure>

1. **From the lists overview, select the Guest Pass list**
2. **Click the Add+ button**
3. **Using the dropdown options, select the sponsor and contact**
4. **Enter the email addresses of contacts that are eligible for guest passes.**&#x20;
5. **When all email addresses are entered, select Add**

**When a logged-in user visits an event website, a banner appears to inform them of their eligibility for a guest pass (Image 3). Clicking to register will reveal a guest pass option (Image 4), including the details of the company and individual that has offered the pass.**&#x20;

<figure><img src="https://s3.amazonaws.com/helpscout.net/docs/assets/547370c3e4b07e8a335a1a8b/images/620cd80068cd260cc2d3bbc8/file-TSamD5ufE0.png" alt=""><figcaption><p><strong>Image 3: A user that appears in a guest pass list will be notified of their eligibility.</strong> </p></figcaption></figure>

<br>

<figure><img src="https://s3.amazonaws.com/helpscout.net/docs/assets/547370c3e4b07e8a335a1a8b/images/620cd8672130e51694687ddf/file-VZ0qevIFu3.png" alt=""><figcaption><p><strong>Image 4: Guest pass is displayed to eligible users.</strong> </p></figcaption></figure>

#### **Success Actions for Guest Passes**

**Within the event’s ticket options, an organiser can configure what happens after successful registration:**

* **Subscribe - the user will be given access to the content after the completion of the event registration process.**&#x20;
* **Create registration request - an admin user is required to approve or decline the user’s event subscription (Images 5, 6, & 7).**&#x20;

<figure><img src="https://lh5.googleusercontent.com/AOLPtIkiv5duZkqXypI6Pthq8710AlpiDaj6UX3v2NS31CsBwUD6ILvC7lEpJ6RH7vjAETm3rmpsj8LCoqD_IsoFVxCWDlL6SEV7jaMWtDt97TBtDKpK-2MCa5b9GwFOXbyFopi5" alt=""><figcaption><p><strong>Image 5: The guest pass list shows the status of each member. In this case, the pass it pending approval by an admin.</strong> </p></figcaption></figure>

<figure><img src="https://lh3.googleusercontent.com/poKHEQMi9v06yTM0k8lOZKc5N_XvCUBwl5zSWvp-dllNXi4v1Icv0gg1jtWp5LFy_nZ76BFskxsblfvvrGS1uR8Gosw7_HzhQOlo-R-sMaPkPCiP642VMs5zLpbnj9QYwkre9yNU" alt=""><figcaption><p><strong>Image 6: To aid the review process, more details are shown on the approvals list, including the name of the contact/sponsor that has offered the guest pass, the user’s job title, company and country as well as the timestamp of the application.</strong> </p></figcaption></figure>

<figure><img src="https://lh3.googleusercontent.com/jINODGJsLvsM7ABllySaROLBAKsGIiGAbQwv4h2rewv53mrIYvZRXpRwohjEmHeDAozWqz3q8mfokxMiHsQXKhhdppGBCchSKPn4zTDDu4MUqqt2nYIHQT50GCPSt70NBTdhV6dM" alt=""><figcaption><p><em><strong>Image 7: Once approved, the guest status is updated.</strong></em> </p></figcaption></figure>

**Admin users can specify whether to show or hide guest passes from non-eligible users:**

* **Hide - the guest pass option only appears to eligible users whose email address is on the guest list**
* **Show - the guest pass option is shown but cannot be selected by non-eligible users.**&#x20;

#### **Generating unique registration links**

**Guest passes can be assigned to users through a unique URL. When the user lands on the page from one of these links, they are added to the guest pass list.**&#x20;

**Note: Only passes that require moderation will be allowed. No quotas can be enforced using this method.**&#x20;

***\[eventUrl]?gp\_ref=\[event\_id]-\[ticket\_option\_id]-\[sponsor\_id]-\[contact\_id]***

* **\[eventURL] = the event website link**
* **\[eventID] = displayed in the Events listing on Papillon backend**
* **\[ticket\_option\_ID] = displayed bottom left of the Ticket options box where you set the ticket up**
* **\[sponsor\_id] = displayed in the Company's profile listing**&#x20;

**Enter the IDs into the URL string without the square brackets and the message will be displayed you are eligible for a guest pass when you land on the event website.**&#x20;

* **Show - the guest pass option is shown but cannot be selected by non-eligible users.**&#x20;

<br>


# Coupons: Schedule, manage and promote

Time to get a woop on for coupons! The latest deployment to our Tickets functionality allows event planners to schedule discounts to apply automatically, reducing the manual tasks involved.

## Coupons: Schedule, manage and promote discounts on tickets based on a date range

It is now possible to schedule discounts that automatically apply to tickets based on a date range. This allows the management of early-bird rates and discount periods from within the Events interface. It simplifies the workflow for event managers as coupons no longer require configuration within Stripe.

This update can only apply to events where tickets are required and hubs with connected Stripe accounts. It is not supported for events that use third-party payment URLs.

**Configuration on Stripe**\
Once the Stripe account is connected, a set of Stripe coupons must be created. These will be the discounts that can be applied to any ticket on Events. As a result, they should cover the variety of possible discounts the organisation will offer - either as a percentage (10% off, 20% off, 30% off) or currency amount (£50 off, £100 off, £250 off).

When creating these coupons in Stripe, please observe the following rules in order to ensure that coupons are displayed within Events:

* Valid forever, no expiry date
* Not applied to specific product
* Currency discounts will need to match with ticket currency
* Percentages apply across the board

**How to create and manage on Events**\
Within a ticket option, there is a new Coupons section where each discount can be managed.

Click manage coupons. The list of discounts that meet the criteria above will be visible. Select a discount to apply.

When a coupon is enabled, the default expiry date is set to two weeks in the future. This can be edited by selecting Edit. When a second coupon is enabled, it is two weeks from the expiry of the previous coupon. When the expiry date on the first coupon is editted, the expiry of the second coupon automatically updates.

![](https://c-assets.papillon.io/image/fetch/s--YnOMApIW--/f_auto/https://dkf1ato8y5dsg.cloudfront.net/uploads/11/156/ticket-option.png)

Multiple coupons can be applied. They are displayed in chronological order with the current active coupon highlighted.\
\
Adding another coupon will add it to the bottom of the list. It will become active from the expiry date of the previous coupon.&#x20;

*IMPORTANT:* Tickets are cached for **1 hour,** so once you have created a coupon please wait for 1 hour 15 minutes before adding it to your ticket. &#x20;

![](https://c-assets.papillon.io/image/fetch/s--YnOMApIW--/f_auto/https://dkf1ato8y5dsg.cloudfront.net/uploads/11/156/available-and-enabled-coupons.png)

Event audiences will see the details of the coupon, including the discount amount and expiry date, in the tickets screen. This information is automatically displayed according to the coupon settings.  &#x20;
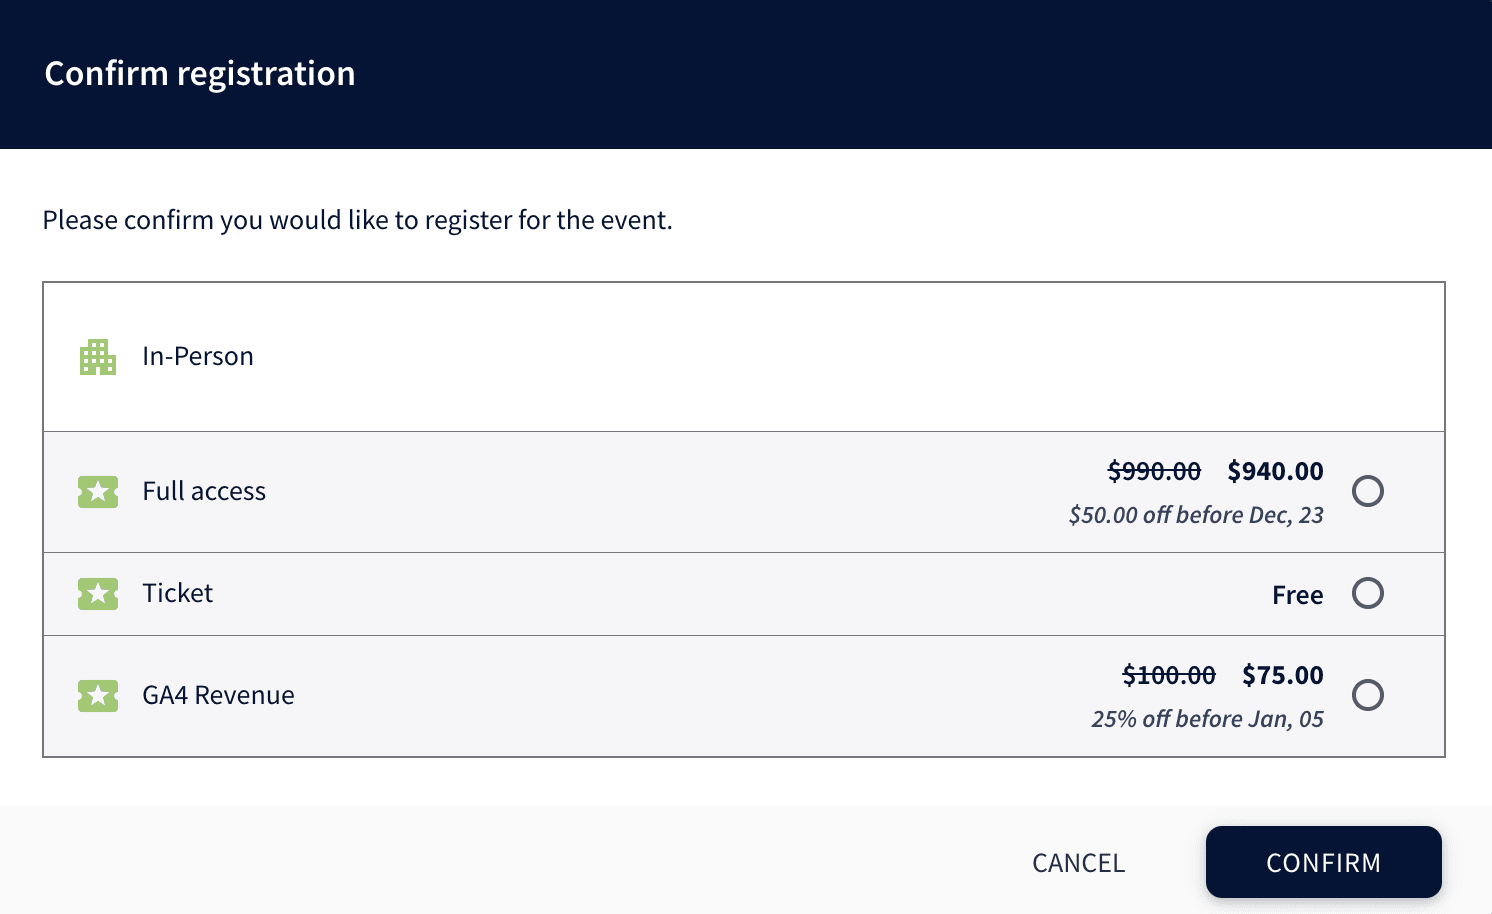
<figure><img src="https://c-assets.papillon.io/image/fetch/s--YnOMApIW--/f_auto/https://dkf1ato8y5dsg.cloudfront.net/uploads/11/156/registration-modal-view.png" alt=""><figcaption></figcaption></figure>


# Adding and Updating ad-hoc Coupons

## Adding and Updating ad-hoc Coupons

Now that you've [set up your tickets](/publishing/control-access/adding-tickets-passes-and-guest-passes) and [integrated your hub with stripe](/integrations/payments), you'll most likely want to add discounts by creating coupons. Watch this video to find out how:&#x20;

{% embed url="<https://fast.wistia.com/embed/medias/jzxaqjla4f.jsonp>" %}

1. Navigate to the 'Products' tab at the top of  your page.
2. Navigate to the 'Coupon' tab on the left-hand  sidebar.&#x20;
3. Click the '+ New' button at the top right-hand  corner.&#x20;
4. Enter the name of your coupon (this is what will  appear internally on your Stripe account) and  the amount you would like the coupon to take  off.&#x20;
5. Select the event you would like this to be  applied to specifically.\
   **WARNING:** You cannot change this  later on, so make sure you select all the events  that this needs to be active for. This includes  the secondary language versions of your event!  Otherwise, you will have to archive the ticket  and start from the beginning. We recommend  searching for your events in the search box by  using the Event Name.&#x20;
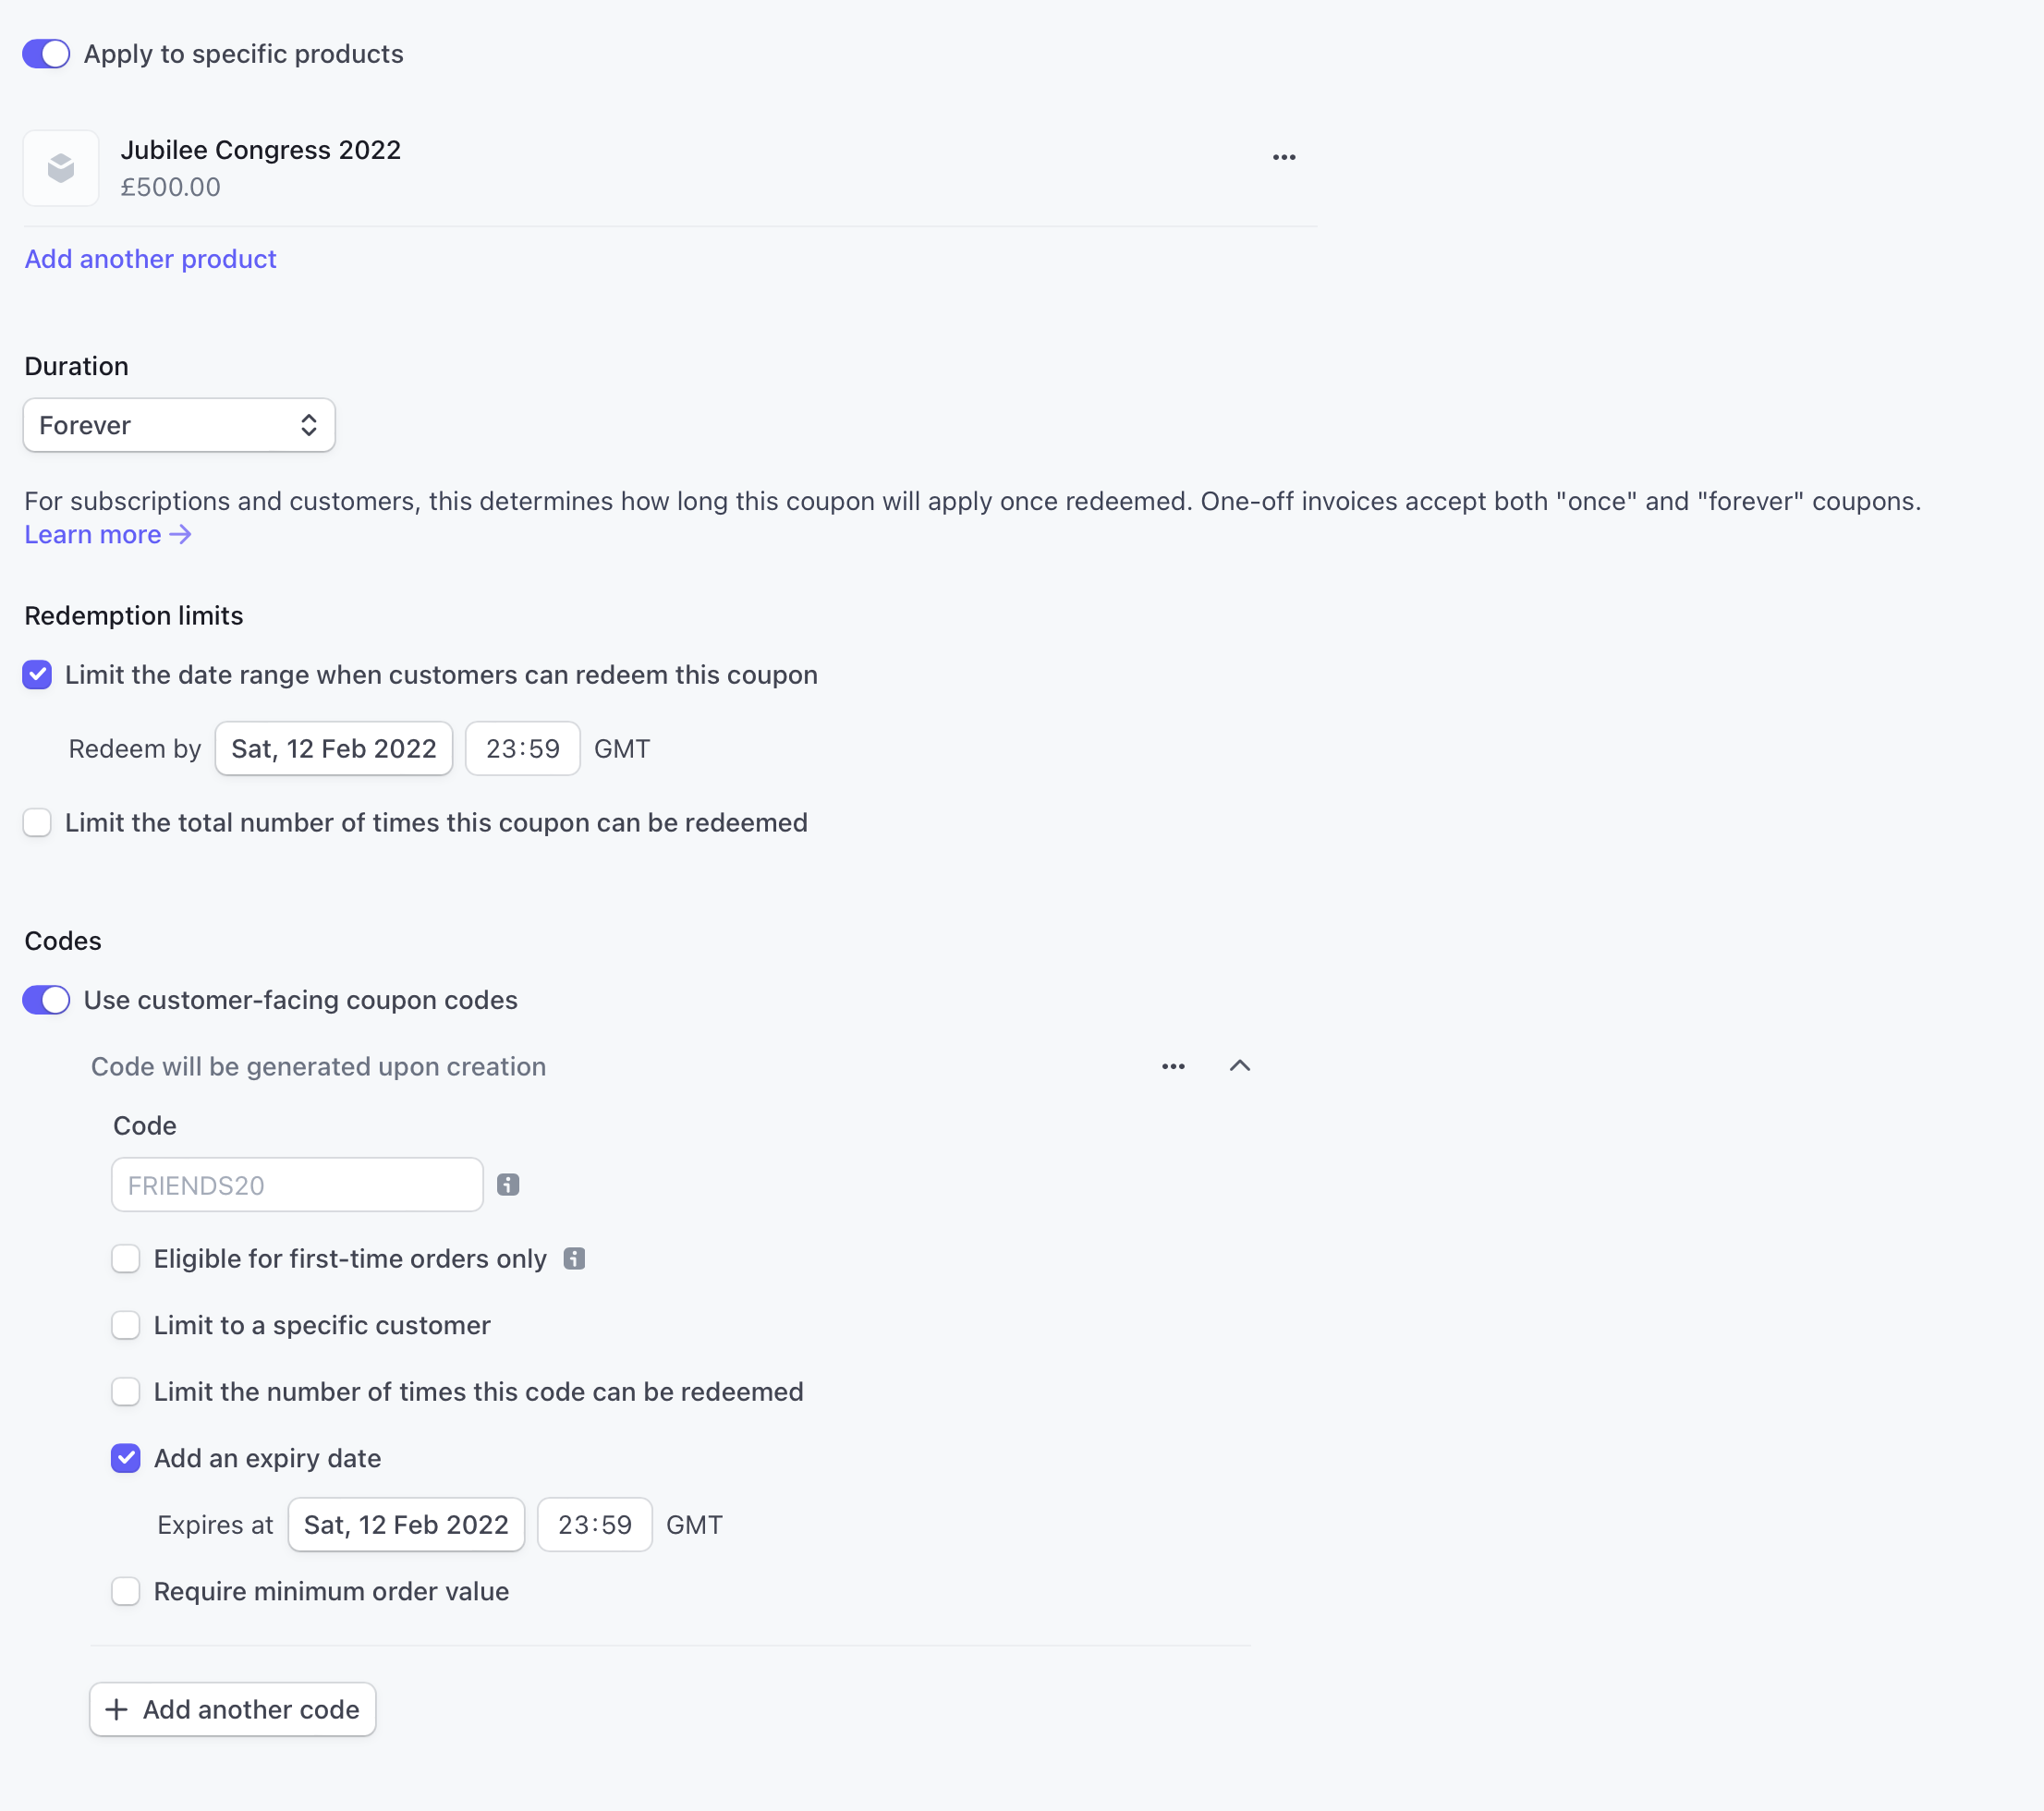
6. Create the customer-facing coupon code and add  an expiry date. Your coupon should look like  this:

   <figure><img src="https://s3.amazonaws.com/helpscout.net/docs/assets/547370c3e4b07e8a335a1a8b/images/620ce3e82130e51694687e1c/file-C0JZfMysrp.png" alt=""><figcaption></figcaption></figure>
7. Click create and your coupon is good to go.
8. If you wish to reuse the customer-facing coupon code, make sure to archive it!


# Approval/Declining Process of Registration Requests

Once you've[ set up your tickets](/publishing/control-access/adding-tickets-passes-and-guest-passes), you may want to include an approval/declining process - this is particularly handy if you have a mixture of Paid Tickets and Free Passes for Eligible Users!

1. Select 'Create Registration Request' under the option 'On Success Action'

![](https://s3.amazonaws.com/helpscout.net/docs/assets/547370c3e4b07e8a335a1a8b/images/620e2a93d86136157d9a552b/file-LcRSPmHxCd.jpg)

2. The emails that are sent to Users who have applied for this pass are automatically generated. Please review, edit and activate them yourself by clicking on the link: Review and activate approval process emails here.<br>

   <figure><img src="https://s3.amazonaws.com/helpscout.net/docs/assets/547370c3e4b07e8a335a1a8b/images/620e2b6539e5d05141b6ad12/file-1K5S0WddID.jpg" alt=""><figcaption></figcaption></figure>

**Handy Tip:** This link also shows all other emails linked to your event! So please check for other emails, such as Registration Confirmation emails sent to Paying Users.<br>


# Guest list to invite contacts and track responses

#### Overview

Contacts that are to be invited to an event can be managed in a guestlist. Admin users can add, view and track all contacts, whereas permitted hub users can add, view and track contacts invited by their organisation.

Access is granted using tickets and passes. Admin users can specify which passes are able to be offered by hub users, according to the company they represent.

#### Grant hub users permission to add and manage contacts in a guestlist

A hub user must be granted permission to invite contacts to an event.

This is done by assigning users to an organisation profile - and then connecting the organisation profile to the event.

Once complete, this will unlock the **Guest Passes** option in the user’s **My Profile** page; and allow the import, invite and tracking of responses from the guestlist. For admin users, all contacts are visible by selecting the guestlist within the event settings Audience > Lists.

Unlimited users can be given permission to manage guest passes for an event via a connected company profile.

To create a company profile and assign it to an event:

1. Navigate to Profiles > Companies > Edit Company Profile > Profile Page
2. Within the **Contacts** section, select **Add contacts**
3. Search the users profiles to find the person you want, and select “Add”
4. Navigate to the event settings from Events
5. Within the **Overview** page, scroll down to **Organisations** (or **Sponsors**)
6. Use the search bar to find the company profile, and select it to add it.
7. Specify the pass(es) that the organisation is eligible to offer its guests.
8. Set a quota, if required. The quota will apply to the total number of guests that register for in-person passes. Quotas cannot be applied to passes with remote attendance mode.

#### Managing a guestlist

A guestlist can be created and managed within an event from either:

1. Admin users: In an event's settings > Audience > Lists.
2. Hub users: My Profile > My Events

**Admin users only**

Admin users must first create a guestlist before hub end users can begin inviting their contacts.

To create a guestlist:

1. Navigate to Event > Audience > Lists
2. Click **+New** button
3. In **Type**, select **Guest List** (or **Guest Passes**)

To add contacts use the **+Add** or **Import** options. [Find out more about adding contacts to a list.](/emails/organise-contacts/add-email-addresses-to-lists)

Admin users can import an unlimited number of contacts to a guestlist.

**Hub users**

To add contacts:

1. Navigate to **My Events** from the My Profile menu when logged in.
2. Select an event.
3. Click the **Guest Passes** button. Only events where the user has permission to manage guests will the **Guest Passes** button be enabled.
4. Use the **+Add** or **Import** function to add a contact.
5. Select the pass to offer the contact. If no pass is selected, the contact will be able to select any of the passes the organisation is entitled to offer.
6. Click **Add** to populate the list with contacts.

**FAQs:**

**How do I create more than one guestlist?**

* Only one guestlist can be created per event. Permitted hub users will only see the contacts added by their organisation. Admin users can view all contacts added by all organisations.

**How do I see which organisations have invited who?**

* Admin users can view all contacts added by all organisations. From the guestlist in Audience > Lists, the list can be filtered by organisation to show the inviting company.

**Can I export the guestlist?**

* Yes, admin users can export a guestlist. Hub users are not able to export.

**What happens if a contact is invited by multiple organisations?**

* Contacts can only appear once in a guestlist. If an admin or hub user attempts to add a contact that is already present in the list, it will be skipped. Hub users are restricted to batch imports of 50 records per upload.

**How do I track responses?**

* Contacts will be visible with contextual information, including the user that added the contact and status of the pass (accepted, declined, not claimed) in both the guestlist (for admin users) and Guest Passes (for hub users).

**What if I don't know what pass a contact wants?**

* When a pass is not specified when a contact is added to a guestlist, all passes available to the company will be displayed at registration.


# Approval/Declining Process of Guest Passes

This guide explains the approval and decline process for guest passes when sponsors or their contacts wish to bring guests to an event. It covers both admin and user actions and email notifications.

### **Moderating Guest Passes**

When creating or managing guest passes, you can enable moderation to control whether a guest pass is approved or declined. This can be configured in two places:

1. **Initial Guest Pass Creation:** Enable moderation during setup.
2. **Guest Pass Settings:** Adjust moderation settings after the guest pass has been created.

<div align="center"><figure><img src="/files/Ohg5wp6aDcPEsZtKbAri" alt="" width="395"><figcaption></figcaption></figure></div>

<figure><img src="/files/QvBALn9ZqxyMtdJEy9sk" alt=""><figcaption></figcaption></figure>

Moderation ensures that each guest pass requires administrative review and approval.

***

### **Actions Overview**

#### **Admin Actions** (Backend Operations)

Admin actions occur on the backend and are managed by administrators. These include:

* **Approve:** The guest pass is approved, allowing the guest to attend the event.
* **Refuse:** The guest pass is declined, preventing the guest from attending.
* **Reset to Pending:** The guest pass is returned to a pending state for further review.

<figure><img src="/files/T1CwqTONO78VKifh7H4b" alt=""><figcaption></figcaption></figure>

**User Actions** (Guest Interactions)

User actions involve the guest’s interaction with the guest pass. These include:

* **Claimed:** The guest has successfully claimed their pass.
* **Unclaimed:** The guest has not yet claimed their pass.
* **Declined:** The guest has declined the pass.

<figure><img src="/files/jP1bPVq5QAfqOtVND9VC" alt=""><figcaption></figcaption></figure>

***

### **Viewing Guest Passes in the Dashboard**

You can view guest passes for all events in the **Dashboard > Guest Passes** section. Clicking on the link for a specific event will take you directly to the guest pass listing, with the list already pre-filtered for that event. This helps you quickly find and manage guest passes relevant to your needs.\
\
For more information, [please read our documentation here](/analytics/guest-passes).&#x20;

***

### **Email Notifications**

We use automatic email notifications to keep sponsors and their contacts informed about guest pass updates.

#### **Daily Email Schedule**

Emails are sent automatically at two times:

* **9:00 AM**
* **3:00 PM**

#### **Admin Action Emails**

Emails are sent to the requester when admin actions are performed:

* **Approved:** Notifies the requester that the guest pass has been approved.
* **Refused:** Notifies the requester that the guest pass has been declined.

<figure><img src="/files/g8CVF1rJxcKqnAmdxxHz" alt=""><figcaption></figcaption></figure>

<figure><img src="/files/d9umtc1jg4CiCdbniLm2" alt=""><figcaption></figcaption></figure>

#### **User Action Emails**

Emails can also be sent for user actions:

* **Claimed:** Notifies the sponsor when a guest claims a pass.
* **Declined:** Notifies the sponsor when a guest declines a pass.

To configure user action emails, and even personalise them, please contact us at <clients@wavecastpro.com>. Please note that some services may incur an extra charge.

***

### **Timeframe Rules for Guest Registration**

We offer optional timeframe rules for guest registration. For example, you can set limits to prevent guests from registering for events more frequently than every six months.

To configure timeframe rules, please contact us at <clients@wavecastpro.com>. Please note that some services may incur an extra charge.

***

### **Assigning Extra Passes**

We offer the ability to assign extra passes to guests.&#x20;

<figure><img src="/files/kjTZKVTxANI9aEF9oVpM" alt=""><figcaption></figcaption></figure>

To configure this, please contact us at <clients@wavecastpro.com>. Please note that some services may incur an extra charge.

***

For further assistance or customization, feel free to reach out to our support team at <clients@wavecastpro.com>.


# Hard and Soft Limits

Coming soon!


# Managing opt-ins

## Assign privacy policy to content item

{% embed url="<https://scribehow.com/shared/Assigning_Privacy_Policy_to_Content__IVXw_Q5PQgWsGmtHMCxUtw>" %}

## Export first-party opt-ins

{% embed url="<https://scribehow.com/shared/Exporting_First_Party_Opt_Ins__gN-jpPfBRP-QAIjLreCOqw>" %}


# Metering

## Setup content metering

Metering allows you to limit the number of articles a user can read within a specific time period before needing to sign-up for an account.

Follow these steps to understand how to enable metering, define the article limit, set a timeframe and customise the metering modal.

{% embed url="<https://scribehow.com/shared/Setup_content_metering__STbill-dT3eU_Rmc3EEDUw?referrer=documents>" %}

## Edit copy/colour on metering modal

This guide provides instructions on how to edit the copy and color on the metering modal. It explains how to customize the message and appearance of the card that users see when they have reached the maximum number of articles they can read. By following these steps, users can easily configure the copy and color settings to match their preferences or branding.

{% embed url="<https://scribehow.com/shared/Edit_copycolour_on_the_metering_modal__1X-xWBW8SlSzA4HTWSOt8w?referrer=documents>" %}


# Extra Fields for Content

## How to set extra fields for webinar/content subscriptions

In cases where you would like to ask attendees additional questions before they subscribe to a piece of content, either an event or document, you will need to fill out the 'Capture additional data' field. \
\
In events, this can be found under *Audience* > *Capture additional data*

<figure><img src="/files/r2qbUTo3qGz6EuTC5Du4" alt=""><figcaption><p>Where to add extra fields in events</p></figcaption></figure>

In other types of content, i.e. articles and documents, this can be found under *Extra Fields.*<br>

<figure><img src="/files/Zt2jBsWK4X9ysBJ48lvV" alt=""><figcaption><p>Where to add extra fields in other types of content, i.e. articles, documents, etc.</p></figcaption></figure>

IMPORTANT: Replace {contentId} with the content ID, e.g. textbox|not\_required|question\_1234|Pose a question:

### Text Fields

```
# Phone number (Required) 
  textbox|required|business_phone|Business Phone
```

```
# Phone number (Optional)
  textbox|not_required|business_phone|Business Phone
```

### Textarea Fields

```
# Pose a question field (Optional)
  textbox|not_required|question_{contentId}|Pose a question:
```

### Dropdown Fields

```
# How did you hear about this webinar (Optional)
  dropdown|not_required|how_did_you_hear_about_this_webinar_{contentID}|
  How did you hear about this webinar?|Colleague,Email,Network,Search Engine,Other
```

```
# Industry field (Required)
  dropdown|required|industry|Industry|Academic,Air,Associations,Charity,
  Chemicals,Engineering,Environment,Financial Services
```

### Radio Buttons

```
# Yes/No radio button (Required)
  radio|required|healthcare_professional_{contentId}|I can confirm that I am a 
  healthcare professional|Yes,No
```

### Checkboxes

```
# Checkbox field (Optional)
  checkbox|not_required|email_updates_other_{contentId}|Following the 
  event, I would like to receive e-mail updates.
```

```
# Checkbox field (Required)
  checkbox|required|terms_{contentId}|I acknowledge that I have read and fully 
  understand this consent
```

### Paragraphs

Use this to include a paragraph within the form. This is useful for adding text that doesn't require user input, either to futher explain questions or to provide extra information to the user on sign up.&#x20;

```
paragraph|From time to time, we would like to send you information 
relating to topics in this event, please tick the box below to recieve 
these emails.
```


# Import users

Audience data can be imported in bulk via the **Audience** > **Import** function.&#x20;

[This is the Google Sheet Template](https://docs.google.com/spreadsheets/d/1lE-LxAAinQwoUNVwPg02PY0KepqPAj_ScvWZ_VFZ1Ng/edit?gid=278063708#gid=278063708) that you will need to use. Alternatively, these are the headings you need to include - remember to save it as a .CSV file!

{% embed url="<https://docs.google.com/spreadsheets/d/1lE-LxAAinQwoUNVwPg02PY0KepqPAj_ScvWZ_VFZ1Ng/edit?gid=278063708#gid=278063708>" fullWidth="false" %}

Notes:

* For easy segmentation it is always good to give the import a batch name: a simple lowercase text reference.
* Ensure the content ID is consistently the same value in the Content Id column. It is recommended that you only import users for a single piece of content (or Event) at a time.
* Ensure the date format is correct:\
  **YYYY-MM-DD HH:MM:SS**\
  *For example: 2018-06-24 20:59:21*\
  *You can customise this format in Google Sheets.*
* Attendance Mode: ***remote*** or ***in\_person*** (Only required if a Hybrid event).
* Ticket Option Id: Ticket option id to assign to the user subscription. When this option is used no need to specify the Attendance Mode.

{% embed url="<https://scribehow.com/shared/Importing_Users__VhdzbxaITyiPzT0Nmdw5NQ>" %}


# Email Lists

{% embed url="<https://scribehow.com/embed/How_to_add_emails_to_email_lists__hMyeLdDwRHOR_WIcOIEc7A>" %}

## **Using Email Lists to Control Access and Personalize Content**

Email lists can be a powerful tool for controlling access to content and personalizing the user experience. Here's how you can leverage them:

* **Control Access via Page Blocks**: You can use email lists to restrict access to certain sections of your website. For example, you could create page blocks or content sections that are only visible to users on specific email lists. This could be used for VIP content, subscriber-only articles, or special promotions.
* **Display Tickets to Specific Users**: By using email domains or specific email addresses, you can grant access to exclusive tickets or events. For instance, only users on an "invited guests" email list might be able to view and register for certain events.
* **Targeted Email Communications**: Email lists help ensure that important notifications (like event invitations, product updates, or newsletters) are sent to the right people. Based on the lists users belong to, you can send personalized emails for different purposes, such as ticket sales or event reminders.

By utilizing email lists, you can effectively control who sees what content and tailor your communication to specific groups of users, ensuring a personalized and secure experience.

***

#### **Control Access via Page Blocks**

{% embed url="<https://scribehow.com/embed/Control_Access_via_Page_Blocks__AtRT73KhT1CdU0Y8Glo65A>" %}

***

#### **Display Tickets to Users in Specified Email Lists**

{% embed url="<https://scribehow.com/embed/Display_Tickets_to_Users_in_Specified_Email_Lists__hjxIJxUQQrKs_mK0gJP2iQ>" %}

***

**Targeted Email Communications**

Please [read this documentation](/emails/organise-contacts/send-a-campaign-to-a-list) on targeted email communications.


# Classify & personalise


# Create & configure taxonomies

## Create a taxonomy

{% embed url="<https://scribehow.com/shared/Create_a_taxonomy_to_categorise_events_andor_content__N2kj5-SESM2IUaqBdHHAXQ>" %}

## Configure the display of taxonomies

{% embed url="<https://scribehow.com/shared/How_to_configure_the_display_of_taxonomies__hp-iR9e5RC27dXcmStqvLQ>" %}


# Custom Headers


# Headers

Creating headers for events is a key part of customizing the appearance and structure of your event pages. Follow these steps to easily create and manage event headers.

1\. Navigate to the Headers Section

To start creating headers for your event pages, first, you need to access the **Headers** section. Here's how:

* **Log in** to your event management platform (or website admin panel).
* On the main dashboard or the left-hand sidebar, go to **Pages**.
* Under the **Pages** section, select **Headers**. This will take you to the header customization interface.
* Choose one of the header types:
  * [Original](#original)
  * [2024](#id-2024)
  * [2025](#id-2025)
  * [HTML](#html)

<figure><img src="/files/GNA2AoL4qqk3lNHaDvJi" alt=""><figcaption></figcaption></figure>

### Original

<figure><img src="/files/4cYSFxm9nWryjROlBv2l" alt=""><figcaption></figcaption></figure>

<figure><img src="/files/fCEZ0glDlcnRuUeiMeHw" alt=""><figcaption></figcaption></figure>

If you would like the text in the header to appear with a background, like so:<br>

<figure><img src="/files/Bmc2i8jwEUZ0zQPM4iGK" alt=""><figcaption></figcaption></figure>

Go to *Settings* > *Appearance* > *Content Headers.* Here you can enable the overlay and choose it's color.

<figure><img src="/files/emO3VgDpBLmUmbycz9g2" alt=""><figcaption></figcaption></figure>

If you would like the same background-image to appear across all your events, input the URL of the image here:<br>

<figure><img src="/files/dVVbh65sEr5liQNvjaKJ" alt=""><figcaption></figcaption></figure>

And if you're not a fan of the register button in your header, you can disable it here:<br>

<figure><img src="/files/C7HMseFS5ZYdpeL4knI2" alt=""><figcaption></figcaption></figure>

### 2024

<figure><img src="/files/WkNplNxLSmsidgUTY1E0" alt=""><figcaption></figcaption></figure>

<figure><img src="/files/XXVBYbew0EEnpOmJT6jC" alt=""><figcaption></figcaption></figure>

If you choose *Event main navigation* as the "Main Navigation", the following options will appear:<br>

<figure><img src="/files/Gka7GiuHLXfSxb4VaUk9" alt=""><figcaption></figcaption></figure>

To configure Event Menu Items, go to *Pages* > *Navigation* and open *Event Navigation* in edit mode (the hamburger icon)

<figure><img src="/files/qltEOHxxF94a2UcX1bH4" alt=""><figcaption></figcaption></figure>

### 2025

Coming soon!

### HTML

We’re excited to share that you can now include raw HTML in your email headers, and our system fully supports [templating languages](/publishing/custom-headers/templating-language) for dynamic content customization!


# Templating Language

Creating Custom Event Headers with the Wavecast Templating Language

When organizing an event, it is possible to use a pre-existing event header or designing a unique one that better fits your requirements. For a more tailored approach incorporating the Wavecast Dynamic Templating Language enables the creation of custom event headers that are dynamic and can be re-used. This guide outlines the steps to create a custom header using the Wavecast Templating Language.

## Creating a Custom HTML Header

**Step 1: Create the Event with a Custom HTML Header**

For the event Edit page, Navigate to Pages > Header and set the header to use Custom HTML.

**Step 2: Create the HTML Structure and Apply Styles**

Your HTML structure serves as the skeleton of your custom header. Here is a simple example that you can modify according to your preferences:

```html
<style>
.custom-event-header {
   padding: 30px 0;
}

.custom-event-header .container {
   position: relative;
}

.custom-event-header .container:before {
   content: " ";
   position: absolute;
   left: -30px;
   top: 0;
   bottom: 0;
   width: 4px;
   background-color: #E60000;
}
</style>

<div class="custom-event-header">
   <div class="container">
      <h1>Event Title</h1>
      <h3>Event Sub-Title</h3>
      <div><p>This is the event summary</p></div>
      <time>Apr 21st, 1pm BST</time> 
      <div><a href="">Add Event to Calendar</a></div>
      
      <a href="#">Register</a>
     
      <!-- If user subscribed for event display this copy -->
      <div>
         You are subscribed to this event
      </div>
   </div>
</div>
```

**Step 3: Incorporate the Wavecast Templating Language to make it dynamic**

To make the event header dynamic, you can use the Wavecast Templating Language. This allows you to insert placeholders that will be replaced with dynamic data, or the use of conditionals.

```html
<div class="custom-event-header">
   <div class="container">
      <h1>[event_title]</h1>
      <h3>[event_sub_title]</h3>
      <div>[event_summary]</div>
      <time>[event_date]</time> 
      <div>[event_add_to_calendar_link]</div>
      
      [sign_up_button]
        
      <div>
         [if is_user_subscribed]
               You are subscribed to this event
         [else]
            You are not subscribed to this event
         [/endif]
      </div>
   </div>
</div>
```

## Template tags available

### Variables

| Templating Tag                        | Description                                 |
| ------------------------------------- | ------------------------------------------- |
| `[page_sub_title]`                    | The subtitle of the current page.           |
| `[page_title]`                        | The title of the current page.              |
| `[event_add_to_calendar_link]`        | Link to add the event to a calendar.        |
| `[event_summary]`                     | Summary of the event.                       |
| `[event_sub_title]`                   | The subtitle of the event.                  |
| `[event_title]`                       | The title of the event.                     |
| `[parent_event_add_to_calendar_link]` | Link to add the parent event to a calendar. |
| `parent_event_summary]`               | Summary of the parent event.                |
| `[parent_event_sub_title]`            | The subtitle of the parent event.           |
| `[parent_event_title]`                | The title of the parent event.              |
| `[main_event_add_to_calendar_link]`   | Link to add the main event to a calendar.   |
| `[main_event_summary]`                | Summary of the main event.                  |
| `[main_event_sub_title]`              | The subtitle of the main event.             |
| `[main_event_title]`                  | The title of the main event.                |
| `[sign_up_button]`                    | The sign button for the event.              |

### Conditionals

````javascript
```
[if is_main_event]
    This content will show if 'is_main_event' is true.
[else]
    This content will show if 'is_main_event' is false.
[/endif]
```
````

````javascript
```php
[if content_type === 'article']
    This copy will show the current content type is 'article'.
[else]
    This copy will show the current content type is not 'article'.
[/endif]
```
````

````javascript
```
[if is_user_subscribed_to_main_event]
    User is subscribed to main_event
[else]
    User is not subscribed to the event
[/endif]
```
````

````javascript
```
[if is_user_subscribed_to_parent_event]
    User is subscribed to parent_event
[else]
    User is not subscribed to the parent_event
[/endif]
```
````

````javascript
```
[if is_user_subscribed]
    User is subscribed to event
[else]
    User is not subscribed to the event
[/endif]
```
````


# Shortcodes

Shortcodes are simple and configurable references to more complex objects such as widgets, content and pages.

**Shortcodes** can be inserted into both the Papillon Editor and HTML Editor to display dynamic objects across your hub without the need for complex code.&#x20;

They contain information on what should be displayed (data); how it should be presented (the format); and how it should behave (actions). Shortcodes usually inherit both styles and data held globally which means that all instances can change from one central update.&#x20;

They use a very simple syntax within square brackets that non-coders can easily understand.&#x20;


# Access Settings

These shortcodes allow you to control content visibility based on guest status, login state, subscription status, email domains, and email lists.

**For the following shortcodes:**

* **`[in_email_domain_list]`**
* **`[not_in_email_domain_list]`**
* **`[in_email_list]`**
* **`[not_in_email_list]`**

Please read [our documentation on Email Lists](/publishing/control-access/email-lists) for further details.

They also all need the parameters `lists="???, ???"` with the IDs of the created Email List.&#x20;

***

**For the following shortcodes:**

* **\[subscriber]**
* **\[not\_subscriber]**

Need the `content_id="???"` with the ID of the event in the shortcode in order to work.

The `attendance_mode` parameter is also accepted and specifies the attendance mode a user needs to have in order to see the content between the shortcode.&#x20;

**Details:**

* **Type**: Text
* **Default Value**: *None*
* **Usage**:&#x20;
  * `attendance_mode="remote"`&#x20;
  * `attendance_mode="in_person"`

***

**\[guest]**

Displays content only to users who are not logged in.

* **Usage**:

```
[guest]
    Content for guests only.
[/guest]
```

***

**\[logged\_in]**

Displays content only to logged-in users.

* **Usage**:

```
[logged_in]
    Content for logged-in users.
[/logged_in]
```

***

**\[subscriber]**

Displays content only to users with an active subscription.

* **Usage**:

```
[subscriber content_id="123"]
    Content for subscribers only.
[/subscriber]
```

***

**\[not\_subscriber]**

Displays content only to users without an active subscription.

* **Usage**:

```
[not_subscriber content_id="123"]
    Content for non-subscribers.
[/not_subscriber]
```

***

**\[email\_domain\_allow]**

Displays content to users whose email domain is explicitly allowed.

* **Parameters**:
  * **domain** *(optional)*: Specify a comma-separated list of allowed domains.
* **Usage**:

```
[email_domain_allow domain="example.com,anotherdomain.com"]
    Content for specific email domains.
[/email_domain_allow]
```

***

**\[email\_domain\_not\_allowed]**

Displays content to users whose email domain is not in the allowed list.

* **Parameters**:
  * **domain** *(optional)*: Specify a comma-separated list of disallowed domains.
* **Usage**:

```
[email_domain_not_allowed domain="restricted.com,blockeddomain.com"]
    Content restricted by email domains.
[/email_domain_not_allowed]
```

***

**\[in\_email\_domain\_list]**

Displays content if the user's email domain is in a predefined list.

* **Usage**:

```
[in_email_domain_list]
    Content for users in the email domain list.
[/in_email_domain_list]
```

***

**\[not\_in\_email\_domain\_list]**

Displays content if the user's email domain is **not** in a predefined list.

* **Usage**:

```
[not_in_email_domain_list]
    Content for users not in the email domain list.
[/not_in_email_domain_list]
```

***

**\[in\_email\_list]**

Displays content if the user's email is explicitly in a predefined list.

* **Usage**:

```
[in_email_list]
    Content for users in the email list.
[/in_email_list]
```

***

**\[not\_in\_email\_list]**

Displays content if the user's email is **not** in a predefined list.

* **Usage**:

```
[not_in_email_list]
    Content for users not in the email list.
[/not_in_email_list]
```

***

### Parameters

The `no_access_message` parameter specifies the text to display when a user does not meet the criteria of these access settings shortcodes.&#x20;

**Details:**

* **Type**: Text
* **Default Value**: Blank space
* **Usage**:&#x20;
  * Set `no_access_message="You do not have access to this content"`&#x20;

***

Each shortcode can be nested within others for more granular visibility control. Make sure to test combinations for the desired effect!


# Content

The \[content] shortcode allows you to display content dynamically on your hub with various customizable options.

**Accepted Parameters**

| Parameter            | Description                                                             | Default Value |
| -------------------- | ----------------------------------------------------------------------- | ------------- |
| ids                  | Comma-separated list of specific content IDs to display.                | None          |
| exclude              | Comma-separated list of content IDs to exclude from display.            | None          |
| title                | Title displayed above the content section.                              | None          |
| width                | Width of the content block (e.g., 1/3rd, full).                         | 1/3rd         |
| no\_optional\_header | Hides the optional header for the content section.                      | FALSE         |
| horizontal           | Toggles horizontal layout.                                              | FALSE         |
| wall                 | Enables masonry-style wall layout.                                      | None          |
| gallery              | Displays content in a gallery-style layout.                             | FALSE         |
| no\_link             | Disables links for content items.                                       | FALSE         |
| link                 | Adds a custom link for the content section.                             | None          |
| class                | Adds custom CSS classes to the content block.                           | None          |
| n\_items             | Specifies the number of items to display.                               | 20            |
| order\_by            | Field by which content is sorted (e.g., created\_at, views).            | created\_at   |
| order                | Sorting direction: ASC (ascending) or DESC (descending).                | DESC          |
| types                | Filters content by specific types.                                      | None          |
| taxonomies           | Filters content by taxonomy IDs (comma-separated).                      | None          |
| terms                | Filters content by specific terms.                                      | None          |
| terms\_to\_exclude   | Excludes content associated with specific terms.                        | None          |
| zone                 | Filters content by a specific zone.                                     | None          |
| channel\_id          | Filters content by a specific channel ID.                               | None          |
| date                 | Filters content by a specific date or date range.                       | None          |
| terms\_operator      | Logical operator for combining term filters: OR or AND.                 | OR            |
| list\_unconnected    | Includes content not connected to a specific taxonomy or term.          | FALSE         |
| no\_row              | Removes the row wrapper around the content block.                       | FALSE         |
| card\_variation      | Defines the style of content cards (see "Card Variations" below).       | default       |
| highlight\_pos       | Specifies positions of highlighted content cards (comma-separated).     | None          |
| clear\_fix\_position | Sets the position for a clearfix div for responsive layout adjustments. | 3             |
| paginate             | Enables pagination for the content display.                             | FALSE         |
| randomize            | Randomizes the order of the displayed content.                          | FALSE         |
| page                 | Specifies the current page for paginated content.                       | 1             |
| wrapper\_class       | Adds custom CSS classes to the content wrapper.                         | None          |
| image\_pos           | Specifies the position of the image in content cards: left or right.    | None          |
| agenda\_open         | Toggles the "open" state for agenda-related content.                    | FALSE         |
| coming\_soon         | Filters content by availability: exclude or only upcoming content.      | None          |

***

### Card Variations

The `card_variation` parameter allows you to customize the style of the displayed content cards. Accepted values include:

| Card Variation  | Description                                                        | Example                                                             |
| --------------- | ------------------------------------------------------------------ | ------------------------------------------------------------------- |
| **`default`**   | The default card style without customization.                      | <img src="/files/WVeCMumHSZlit7zPfgOe" alt="" data-size="original"> |
| **`2022`**      | A modern, grid-based card style.                                   | <img src="/files/iRhdVOKZKgOMVtwbTMHp" alt="" data-size="original"> |
| **`full`**      | Displays the entire content piece on a page                        | <img src="/files/WxR1veVMDLgSAQhRjx4V" alt="" data-size="original"> |
| **`headline`**  | A simplified style emphasizing headlines without a card container. | <img src="/files/HqUIkmHfhOOnYUxmJhka" alt="" data-size="original"> |
| **`list-view`** | A compact, list-style layout.                                      | <img src="/files/NXoDY69VLJSUAFbD7wxZ" alt="" data-size="original"> |
| **`list`**      | Another list-style variation with subtle differences.              | <img src="/files/tJUhPP1EMFugB7JbJwOP" alt="" data-size="original"> |

***

### **Examples**

**Basic Usage**

```
[content 
    title="Latest Articles" 
    n_items="10" 
    width="full" 
    card_variation="headline"]
```

* Displays the 10 latest articles in a full-width layout using the "headline" card style.

**Filtering by Taxonomy**

```html
[content 
    taxonomies="12,15" 
    terms_operator="AND" 
    n_items="5" 
    order_by="created_at" 
    order="DESC"]
```

* Displays the top 5 most-viewed items associated with taxonomy IDs 12 and 15.

**Excluding Content**

```html
[content 
    exclude="45,89" 
    n_items="20"
    card_variation="list"]
```

* Displays 20 content items, excluding items with IDs 45 and 89, using the "list" card style.

**Randomized Content**

```html
[content 
    randomize="true" 
    n_items="8"]
```

* Displays 8 randomly selected items


# Content with Search Bar

The \[content\_with\_search\_bar] shortcode allows you to display your content or subsections of your content library. It enables users to search for and filter content directly on the page.

#### **Parameters**

| **Parameter**         | **Description**                                                                   | **Accepted Values**           | **Default Value** |
| --------------------- | --------------------------------------------------------------------------------- | ----------------------------- | ----------------- |
| `pageId`              | Specifies the page to display the content search results.                         | A valid page ID.              | `1`               |
| `taxonomy`            | Filters content based on taxonomy IDs.                                            | Comma-separated taxonomy IDs. | *None*            |
| `ids`                 | Displays specific content items based on their IDs.                               | Comma-separated content IDs.  | *None*            |
| `zone_id`             | Filters content by a specific zone.                                               | A valid zone ID.              | *None*            |
| `channel_id`          | Filters content by a specific channel.                                            | A valid channel ID.           | *None*            |
| `format`              | Sets the format of the displayed content (e.g., as a masonary wall or in a list). | `list`                        | *None*            |
| `enable_multi_select` | Enables or disables the ability to select multiple filters simultaneously.        | `true`, `false`.              | `true`            |
| `list_unconnected`    | Displays content that is not connected to other entries or relationships.         | `true`, `false`.              | `false`           |

***

#### **Usage Examples**

| **`default`**             | `[content_with_search_bar taxonomies='905']`            | <img src="/files/VGmrMzfIAPrPTX7vb6HJ" alt="" data-size="original"> |
| ------------------------- | ------------------------------------------------------- | ------------------------------------------------------------------- |
| **`format`**              | `[content_with_search_bar format="list"]`               | <img src="/files/nrRTCm6lwZTpAnEboAaq" alt="" data-size="original"> |
| **`enable_multi_select`** | `[content_with_search_bar enable_multi_select="false"]` | <img src="/files/0lJuuy2exqpAoKnByEpX" alt="" data-size="original"> |
| **`enable_multi_select`** | `[content_with_search_bar enable_multi_select="true"]`  | <img src="/files/PWTFZ3Yru0IGPSbkf866" alt="" data-size="original"> |


# Event Manager

You can now assign anyone with an [Admin Account ](/settings/access-control/admin-accounts)as an Event Managers to your events:

<figure><img src="/files/0QGp8ahxrzddsF5smHq4" alt=""><figcaption></figcaption></figure>

And you can even filter your events by Event Managers - making it even easier to find the events you're responsible for!&#x20;

<figure><img src="/files/qRAroGpMDAh82iTSXtKz" alt=""><figcaption></figcaption></figure>

Did you also know that you can get this to display as a card on the frontend? Simply use the shortcode `[event_manager event_id="???"]`. It will then appear like so:

<figure><img src="/files/aNfne0F7pTDRVScaf08y" alt=""><figcaption></figcaption></figure>


# Events with Search Bar

The \[events\_with\_search\_bar] shortcode allows you to display your events or subsections of your events library. It enables users to search for and filter content directly on the page.

Before using the `[events_with_search_bar]` shortcode, you need to configure your settings under *Event listing settings*&#x20;

<figure><img src="/files/YEnvDz6jvBg63QN76hLv" alt=""><figcaption></figcaption></figure>

You can also display Taxonomy Filters by adjusting *Display Global Filter* and *Display Taxonomy Groups*. More information on how to configure taxonomies for events can be found [here](/publishing/classify-and-personalise/create-and-configure-taxonomies).

This can be found under *Settings* > *Event Settings*

<figure><img src="/files/R2egVtFnvwVe01fE497H" alt=""><figcaption></figcaption></figure>

When placed, it will render your events like so:<br>

<figure><img src="/files/lQ3gkbwmdjeBVQFDPXDe" alt=""><figcaption></figcaption></figure>

{% hint style="warning" %}
When your event is live, a badge will display indicating this. If you would like this to be removed please contact us a <clients@wavecastpro.com> and we will remove it with custom CSS
{% endhint %}

<figure><img src="/files/gud01Y0DgT0JpVm4xSaS" alt=""><figcaption></figcaption></figure>

These are the following parameters which are accepted:

<table><thead><tr><th width="130">Parameter</th><th width="134">Type</th><th width="494">Description</th></tr></thead><tbody><tr><td><code>page_id</code></td><td>String (default: '1')</td><td>Specifies the page ID of the pagination for the event listing. This parameter determines the specific page to display events on. If not set, defaults to page 1.</td></tr><tr><td><code>attendance_mode</code></td><td>Array (default: null)</td><td>Defines the attendance modes for filtering events. Accepts a comma-separated list (e.g., remote,in_person). If set to null, no filtering by attendance mode is applied.</td></tr></tbody></table>


# Full Width Carousel Slider

The full\_width\_carousel\_slider shortcode is a versatile tool designed to create a visually engaging carousel slider. It displays a customizable set of content items, e.g articles, channels and events.

### Parameters

<table><thead><tr><th width="149">Parameter</th><th width="296">Description</th><th width="116">Default</th><th width="189">Example Usage</th></tr></thead><tbody><tr><td>n_items</td><td>Specifies the number of items to display in the carousel.</td><td>6</td><td>n_items="4"</td></tr><tr><td>order_by</td><td>Determines the sorting criterion for the content. <br><strong>Note</strong>: Ignored if ids is provided.</td><td>created_at</td><td>order_by="title"</td></tr><tr><td>order</td><td>Defines the sorting direction.<br><strong>Note</strong>: Ignored if ids is provided.</td><td>DESC</td><td>order="ASC"</td></tr><tr><td>terms</td><td>Filters content based on taxonomy terms.</td><td>None</td><td>terms="news, current"</td></tr><tr><td>types</td><td>Specifies content types to include <strong>Note</strong>: does note accept channels or event types.</td><td>None</td><td>types="article, document"</td></tr><tr><td>format</td><td>Configures the visual style of the carousel. Use 2025 for a modern appearance.</td><td>null (classic)</td><td>format="2025"</td></tr><tr><td>exclude</td><td>Excludes specific content items by their IDs.</td><td>None</td><td>exclude="101, 102"</td></tr><tr><td>ids</td><td>Specifies IDs of content to display, overriding other filters. <br><strong>Note</strong>: Now supports multiple content types, e.g. channels and events.</td><td>None</td><td>ids='201, 301, 401"</td></tr></tbody></table>

### Example Configuration

```
[full_width_carousel_slider 
    ids="3668313,3646134"]
```

<figure><img src="/files/oTW1rWJn8KXE2gV5y83k" alt=""><figcaption></figcaption></figure>

```
[full_width_carousel_slider 
    ids="3668313,3646134" 
    format="2025"]
```

<figure><img src="/files/pxORhqEh0cOzSndZzwR9" alt=""><figcaption></figcaption></figure>


# Countdown

Coming soon! The \[countdown] shortcode is a powerful tool designed to create a visually appealing countdown timer for events.

#### **Parameters**

| **Parameter**           | **Description**                                     | **Accepted Values**                                       | **Default Value**            |
| ----------------------- | --------------------------------------------------- | --------------------------------------------------------- | ---------------------------- |
| `event_id`              | Specifies the event(s) to countdown to.             | A comma-separated list of event IDs (e.g., `1,2,3`).      | *Required*                   |
| `data_items`            | Defines the time units to include in the countdown. | `years`, `months`, `days`, `hours`, `minutes`, `seconds`. | `days,hours,minutes,seconds` |
| `data_labels`           | Custom text for each time unit label.               | Any text (e.g., `Días`, `Heures`).                        | `Days,Hours,Minutes,Seconds` |
| `display_labels`        | Toggles visibility of the labels.                   | `true`, `false`.                                          | `true`                       |
| `expiration_message`    | Message displayed when the countdown expires.       | Any text (e.g., `Event Started`, `Over`).                 | `EXPIRED`                    |
| `card_edges`            | Style for the edges of the countdown cards.         | `square`, `rounded`.                                      | `square`                     |
| `card_background_color` | Background color of the countdown cards.            | Any valid HEX color (e.g., `#000000`).                    | Accent color of your theme.  |
| `card_text_color`       | Text color for the countdown cards.                 | Any valid HEX color (e.g., `#ffffff`).                    | `#ffffff` (white).           |
| `card_border_color`     | Border color of the countdown cards.                | Any valid HEX color or `none`.                            | `none`                       |
| `card_font_size`        | Font size for text inside the countdown cards.      | Any valid CSS font size (e.g., `14px`).                   | `24px`                       |
| `font_size`             | Overall font size for the countdown.                | Any valid CSS font size (e.g., `12px`).                   | `18px`                       |

***

#### **Usage Examples**

1. **Basic Countdown to a Single Event**

   ```shortcode
   [countdown event_id="1"]
   ```
2. **Countdown with Custom Labels and Data Items**

   ```shortcode
   [countdown 
       event_id="2" 
       data_items="days,hours,minutes" 
       data_labels="Días,Horas,Minutos"]
   ```
3. **Customized Countdown Card Appearance**

   ```shortcode
   [countdown 
       event_id="3" 
       card_edges="rounded" 
       card_background_color="#333333" 
       card_text_color="#00FF00" 
       card_border_color="#FF0000" 
       card_font_size="16px"
       font_size="14px"]
   ```
4. **Countdown with an Expiration Message**

   ```shortcode
   [countdown event_id="1" expiration_message="The event has started!"]
   ```

***

#### **Notes**

* **Event Dependency:** The countdown will function only if a valid `event_id` is provided and associated with an event in the system.
* **Parameters:** The number of `data_labels` needs to be in the same order and be the same amount as the `data_items`
* **Coming Soon:** This shortcode is not yet published, but we are excited to release it soon! Stay tuned for updates.


# Buttons

This documentation outlines the functionality and usage of the button shortcodes available on the platform.

We have four different button shortcodes:

1. [Register Button](#register-button)
2. [Signup Button](#signup-button)
3. [Signup with LinkedIn Button](#signup-with-linkedin-button)
4. [Button](#button)

***

### Register Button

The \[register\_button] shortcode is designed to make event registration accessible across various pages associated with an event. This shortcode can be used to display a registration button that dynami

#### How to use

Place the `[register_button]` shortcode on any event-related page where you want users to have access to the registration option. This includes:

* **Event main page**
* **Event sub-pages**
* **Sub-events**
* **Individual sessions**

{% hint style="info" %}
If your register button is placed incorrectly, a helpful message should appear explaining the issue.
{% endhint %}

#### Behaviour Across Event Hierarchy

The `[register_button]` shortcode rolls registration up to the highest level of the event hierarchy if required. This behavior is similar to the main "Register" button in the header.

For example, if a session is part of a **super-event** that requires registration, placing the `[register_button]` on the session page will display the **super-event registration** instead of the session registration, if you are not registered for the super-event.

**Example Hierarchy:**

* Super Event (requires registration)
  * Sub-event
    * Session

If `[register_button]` is placed on the **Session** page, it will display the registration form for the **Session** if you're already registered for the **Super Event**.

#### Additional Notes

#### Dynamic, Adaptive Behavior

The `[register_button]` shortcode is designed to be fully responsive, adjusting both its link and behavior based on the page context and user state—similar to the adaptive registration button in the site header.

* **Context-Aware Linking**: The button dynamically links to the appropriate registration page based on where it’s placed within the event hierarchy.
* **User-Sensitive Actions**: The button also adapts based on the user's login and registration status:
  * **Logged Out Users**: If the user is not logged in, clicking the button will trigger a sign-in prompt to ensure a seamless registration experience.
  * **Already Registered Users**: If the user is already registered for the event, the button will not display, avoiding unnecessary prompts.

This responsive behavior ensures that the `[register_button]` remains relevant and useful, providing only the actions the user needs at each stage of the registration process.

#### Styling&#x20;

The `[register_button]` can be styled through CSS if customizations are needed to match your theme.\
\
If you wish to change the alignment or width of your button, please utilise the advanced settings of the block in which it is located.&#x20;

***

### Signup Button

The **Sign-up Button** and the **Sign-up CTA Button** is used for guiding users to sign-up pages. It supports linking to external pages or the platform's sign-up page.

#### Parameters

<table><thead><tr><th width="144">Attribute</th><th>Description</th><th>Default Value</th><th>Example Value</th></tr></thead><tbody><tr><td>text</td><td>The text displayed on the button.</td><td>Sign up</td><td>Register Now</td></tr><tr><td>bg_color</td><td>The background color of the button.</td><td>(None)</td><td>#FF5733</td></tr><tr><td>link</td><td>The URL the button links to. Defaults to the platform's sign-up page with a redirect parameter.</td><td>signUpUrl() . '?on_auth_redirect_to=' . currentPageUrl()</td><td>https://example.com/register</td></tr><tr><td>target</td><td>Specifies where to open the link. If set, opens the link in a new tab (_blank).</td><td>_blank if link is provided; otherwise ''</td><td>_self</td></tr></tbody></table>

{% hint style="info" %}
The \[signup\_cta] also accepts the parameter image, so you can paste in the URL of an image you would like to display in the CTA.
{% endhint %}

**Behavior:**

* If the `link` is not provided, the button will redirect users to the platform's sign-up page with a redirect back to the current page upon completion.
* Supports customizable text and background color.

**Example Shortcode:**

```
[signup_button 
    text="Join Now" 
    bg_color="#4285F4" 
    link="https://example.com/signup" 
    target="_blank"]
    
[signup_cta
    text="Join Now" 
    bg_color="#4285F4" 
    link="https://example.com/signup" 
    target="_blank"]
```

***

### Signup with LinkedIn Button

#### Before starting this, please read our documentation on [LinkedIn Sign Up Setup](/integrations/linkedin-sign-up-setup).

#### Parameters

| Attribute | Description                       | Default Value       | Example Value |
| --------- | --------------------------------- | ------------------- | ------------- |
| text      | The text displayed on the button. | Sign upUSE Linkedin | Learn More    |

**Example Shortcode:**

```
[signup_with_linkedin_button
    text="Sign in with LinkedIn"]
```

***

### Button

The `[button]` shortcode is a flexible element designed for creating customizable buttons that can link to specific URLs.

#### Parameters<br>

| Attribute | Description                                                           | Default Value          | Example Value                  |
| --------- | --------------------------------------------------------------------- | ---------------------- | ------------------------------ |
| text      | The text displayed on the button.                                     | Sign up                | Learn More                     |
| bg\_color | The background color of the button.                                   | (None)                 | #007BFF                        |
| link      | The URL the button links to. Defaults to a local action when not set. | # (Local registration) | <https://example.com/register> |
| target    | Specifies where to open the link.                                     | '' (Current tab)       | \_blank                        |

**Example Shortcode:**

```
[button 
    text="Learn More" 
    bg_color="#FF5733" 
    link="https://example.com/learn" 
    target="_blank"]
```


# Popular Now

This shortcode is used to display the most popular content across your hub. It provides a simple and efficient way to showcase trending content based on views.

### **Functionality**

1. **Purpose**: Displays the most popular content from your hub based on user engagement (views).
2. **Defaults**:
   * **Content selection**: The last 30 most popular items within the past 30 days.
   * **Sorting**: Defaults to descending order by the number of views.
   * **Caching**: Results are cached for two hours to optimize performance.
   * **Exclusions**: Does not display event-type content.
   * **Pagination**: Not supported for this shortcode.
3. **Customization**: Accepts all parameters supported by the `[content]` shortcode, allowing full control over the layout and behavior. Please [read this documentation](/publishing/shortcodes/content) for more information.

***

### Parameters

The `n_days` parameter specifies the number of past days to consider when determining the most popular content.

**Details:**

* **Type**: Integer
* **Default Value**: `30`
* **Usage**: Adjust this parameter to fetch popular content from a specific timeframe. For example:
  * Set `n_days=7` to display content from the past week.
  * Set `n_days=90` to display content from the last 90 days.

**Example:**

| **Example**                 | **Description**                                          |
| --------------------------- | -------------------------------------------------------- |
| `[popular_now n_days="7"]`  | Displays the most popular content from the past 7 days.  |
| `[popular_now n_days="90"]` | Displays the most popular content from the past 90 days. |


# Engagement Tools

The \[post\_box] and \[live\_feed] shortcodes are powerful tools to enhance engagement and interactivity on your platform.

These two shortcodes, `[post_box]` and `[live_feed]`, allow you to gather user input, display live feedback, or even embed polls within articles or across different sections of your website.

By using these shortcodes, you can:

* **Personalize the User Experience**: Place input boxes and live feeds in strategic locations to create a tailored, interactive journey for your users.
* **Foster Engagement**: Encourage user participation by collecting comments, questions, or poll responses directly on relevant pages or articles.
* **Enable Dynamic Interactions**: Use live feeds to showcase real-time updates, making it easy for users to see new comments, feedback, or event discussions as they happen.

These shortcodes are ideal for embedding live Q\&A sections, enabling community discussions, or placing polls in articles to keep users engaged without redirecting them to another page.

Whether you're running a live event, creating an interactive blog, or fostering community engagement, `[post_box]` and `[live_feed]` give you the flexibility to seamlessly integrate these features into your content.

***

### **\[post\_box]**

The `[post_box]` shortcode allows users to post comments, questions, or other input into a feed. It includes a customizable placeholder for the input field.

* **Parameters**:
  * **content\_feed** *(required)*: The target event where user input will be posted.
  * **placeholder** *(optional)*: Text displayed in the input field before the user types anything.
    * **Default**: *Post a comment or question.*
* **Usage Examples**:

| **Example**                                         | **Description**                                     |
| --------------------------------------------------- | --------------------------------------------------- |
| `[post_box content_feed="1234"]`                    | Displays a post box with the default placeholder.   |
| `[post_box placeholder="Share your thoughts here"]` | Displays a post box with a custom placeholder text. |

***

### **\[live\_feed]**

The `[live_feed]` shortcode displays a live feed of user-generated content or updates from a specific content feed.

* **Parameters**:
  * **content\_feed** *(required)*: Specifies the event feed to display.
* **Usage Examples**:

| **Example**                       | **Description**                         |
| --------------------------------- | --------------------------------------- |
| `[live_feed content_feed="1234"]` | Displays the default live content feed. |


# Events

The events shortcode allows you to display and customize event listings based on a variety of parameters. Below is a detailed breakdown of the available options:

<table><thead><tr><th width="206">Parameter</th><th width="264">Options</th><th width="225">Description</th></tr></thead><tbody><tr><td>format</td><td>horizontal, live-session, on-demand, agenda, calendar, wave-card, null</td><td>Specifies the event layout format. horizontal supports highlighting via highlight_position.</td></tr><tr><td>width</td><td>full, 1/2, 1/3, 1/4</td><td>Defines the width of the event display.</td></tr><tr><td>highlight_position</td><td>Numerical (e.g., 1, 2)</td><td>Sets the position of the highlighted event. Works only with the horizontal format.</td></tr><tr><td>include</td><td>main_only, all</td><td>Determines whether to display only main events or include all events. Ignored if event_id is provided.</td></tr><tr><td>event_id</td><td>Numerical (e.g., 1)</td><td>Displays sub-events of a specific event.</td></tr><tr><td>lang</td><td>en, pt, es, cn, kr, all</td><td>Filters events by language.</td></tr><tr><td>date</td><td>upcoming, past, all</td><td>Filters events by date. Defaults to upcoming.</td></tr><tr><td>day</td><td>Specific date (YYYY-MM-DD, e.g., 2021-06-21)</td><td>Retrieves events occurring on the specified date.</td></tr><tr><td>terms</td><td>Numerical list (e.g., 1,2,3)</td><td>Filters events based on specific terms (comma-separated).</td></tr><tr><td>terms_operator</td><td>and, or</td><td>Defines how terms are combined for filtering. Defaults to and.</td></tr><tr><td>limit</td><td>Numerical (e.g., 5)</td><td>Limits the number of events displayed. Also applies to the number of items per page if pagination is enabled.</td></tr><tr><td>list_unconnected</td><td>yes, no (default: no)</td><td>Includes or excludes events not connected to other entities.</td></tr><tr><td>paginate</td><td>yes</td><td>Enables pagination. Remove this parameter if pagination is not required.</td></tr><tr><td>channel_id</td><td>Numerical (e.g., 1)</td><td>Lists events assigned to a specific channel.</td></tr><tr><td>exclude_channel_id</td><td>Numerical (e.g., 1)</td><td>Excludes events assigned to a specific channel.</td></tr><tr><td>event_type</td><td>single-session, multi-session, super-event</td><td>Filters events by type.</td></tr><tr><td>event_format</td><td>broadcast, meeting</td><td>Filters events by format.</td></tr><tr><td>event_badges</td><td>Comma-separated list (e.g., webinar,conference)</td><td>Filters events by badges.</td></tr><tr><td>no_results_message</td><td>Text</td><td>Customizes the message displayed if no events are found.</td></tr><tr><td>attendance_mode</td><td>remote, in_person, hybrid</td><td>Filters events by attendance mode.</td></tr></tbody></table>

{% hint style="warning" %}
By default, only **upcoming events** are shown. If you want to include past events or a series, specify `date="all"` to ensure they remain visible.
{% endhint %}

***

#### **Shortcode Examples**

**1. Highlighted Horizontal Layout**

```plaintext
[events 
    format="horizontal" 
    highlight_position="2" 
    date="upcoming" 
    limit="3"]
```

<figure><img src="/files/5qGWVTrSSJYl2NJWAm5R" alt=""><figcaption></figcaption></figure>

**2. Display Marketing Webinars Only**

```plaintext
[events terms="marketing"]
```

**3. Past Sub-events for a Super Event**

```plaintext
[events 
    display="all"
    event_id="123"]
```

<figure><img src="/files/GXmVOrE2HvQd6LWnW7Yv" alt=""><figcaption></figcaption></figure>

**4. Upcoming Events with Pagination**

```plaintext
[events 
    format="horizontal"
    date="upcoming" 
    paginate="yes"]
```

<figure><img src="/files/s7sKgz9MMxXGXdnEIM5t" alt=""><figcaption></figcaption></figure>


# RSS Feeds

Our platform supports the integration of RSS feeds into your content, allowing you to display dynamic updates from external blogs, news sites, or other RSS sources.

**RSS Feed Shortcode**

Use the following shortcode structure to integrate RSS feeds into your pages:

```
[rss_feed
    feed_url="http://example.com/feed"
    n_items="10"
    read_more_text="Read more"
    read_more_url="http://example.com/"
    read_more_url_text="View more articles"
]
```

***

**Shortcode Attributes**

The table below outlines each attribute available in the shortcode and its purpose:

<table><thead><tr><th width="199">Attribute</th><th width="230">Description</th><th width="137">Example Value</th><th width="150">Default Value</th></tr></thead><tbody><tr><td>feed_url</td><td>The URL of the RSS feed to display. </td><td>http://example.com/feed</td><td>None (required)</td></tr><tr><td>n_items</td><td>The number of feed items to display.</td><td>10</td><td>5</td></tr><tr><td>read_more_text</td><td>The text displayed for the "Read more" link under each RSS item.</td><td>Continue reading</td><td>Read more</td></tr><tr><td>read_more_url</td><td>A link to the external page for additional articles (usually the main feed source).</td><td>http://example.com/blog/</td><td>None</td></tr><tr><td>read_more_url_text</td><td>The text displayed for the external link to view more articles.</td><td>View more articles on XYZ Blog</td><td>View more</td></tr></tbody></table>


# Images

## Auto-formatting of image uploads

When an image is uploaded, multiple versions are automatically created and formatted in the different dimensions used by hub components. &#x20;

To view all versions of an image, go to **Assets** > find the image > *Edit Asset*. From here, it is possible to [replace an image](#replacing-images).&#x20;

It is recommended to upload images as PNGs with a transparent background in the dimensions 1920x1080px. This is the optimal size for an image to be resized, as anything smaller than this may distort images.&#x20;

It is not advised to upload images that include text, as the wording can easily become cropped in reformatted versions. Instead, upload text as a separate PNG with transparent background and apply as a layer on top of another image.&#x20;

## Image dimensions

The following table defines the image format, dimensions and the components on which it appears.&#x20;

<table><thead><tr><th width="160">Format</th><th width="169">Dimensions (px)</th><th>Component</th></tr></thead><tbody><tr><td>Hero</td><td>3200 x 800</td><td>Banner image at the top of events and channels.</td></tr><tr><td>Header</td><td>2000 x 350</td><td>Displayed at the top of an article</td></tr><tr><td>Media</td><td>1280 x 720</td><td>Displayed in carousels when screens are <strong>greater than</strong> 601px (laptops); content listing pages when screens are <strong>greater than</strong> 601px (laptops); and at the top of documents and articles in default layouts.</td></tr><tr><td>Square</td><td>1000 x 1000</td><td>Displayed in carousels when screens are <strong>less than</strong> 601px (mobiles); and content listing pages when screens are <strong>less than</strong> 601px (mobiles).</td></tr><tr><td>Thumb</td><td>640 x 360</td><td>The image displayed in listings. </td></tr><tr><td>Cover</td><td>1920 x 304</td><td>Cover image of a Document </td></tr></tbody></table>

## Replacing images

It is advised that the different versions of an image are checked after upload, to confirm the reformatted versions are as required.&#x20;

1. Go to **Assets** > find the image > *Edit Asset*\
   ![](https://c-assets.papillon.io/image/fetch/s--YnOMApIW--/f_auto/https://dkf1ato8y5dsg.cloudfront.net/uploads/11/156/screenshot-2023-02-08-at-131759.png)
2. The format and dimensions are displayed above each image.\
   ![](https://c-assets.papillon.io/image/fetch/s--YnOMApIW--/f_auto/https://dkf1ato8y5dsg.cloudfront.net/uploads/11/156/image-above.png)
3. To manually replace an image, select ‘Choose file’ and upload your own file. \
   ![](https://c-assets.papillon.io/image/fetch/s--YnOMApIW--/f_auto/https://dkf1ato8y5dsg.cloudfront.net/uploads/11/156/download-at-bottom.png)

Click *Update Asset* to apply the new image to the hub component. <br>


# Widgets

Widgets are versatile tools used to display dynamic content or functionalities within your application or website.

**What Are Widgets?**

Widgets are modular components that allow you to add specific features or content blocks to your application or website. They can display information, facilitate interaction, or enhance user experience through customizable settings. You can find them under *Widgets* > *Widgets* in the sidebar:

<figure><img src="/files/orh5mHiUiZDwU6ZBDIss" alt=""><figcaption></figcaption></figure>

You can even use these to build up event pages! Please read our documentations on building with blocks [here](/events/setup-your-first-event).<br>

<figure><img src="/files/xj9pXr25fHTzXFQLPlEi" alt=""><figcaption></figcaption></figure>

We have five different kinds of widgets:

* [HTML](#html)
* [Hero](#hero)
* [Testimonial](#testimonial)
* [Speakers](#speakers)
* [DOC Download CTA Pop-up](#doc-download-cta-pop-up)

You can also [build up your own templates](#building-widget-templates)!

***

### HTML

Coming soon!

***

### Hero

Coming soon!

***

### Testimonial

Coming soon!

***

### Speakers

Coming soon!

***

### DOC Download CTA Pop-up

Coming soon!

***

### Building Widget Templates

Coming soon!


# Ad Banners

Hubs can be configured to support ad banners across various page templates.&#x20;

{% hint style="info" %}
Please [contact support](/#contact-support) if you require assistance with configuration.&#x20;
{% endhint %}

## Supported advertising banners

The following dimensions of ad banner are supported.

<table><thead><tr><th width="237">Name</th><th width="277">Position</th><th>Dimensions (pixel)</th></tr></thead><tbody><tr><td>Leaderboard (Header)</td><td>Above the header on any page. </td><td>728 x 90</td></tr><tr><td>Leaderboard (Footer)</td><td>Above the footer on any page. </td><td>728 x 90</td></tr><tr><td>Medium Rectangle</td><td>In the sidebar. </td><td>300 x 250</td></tr><tr><td>Large Skyscraper</td><td>In the sidebar. </td><td>300 x 600</td></tr></tbody></table>

## **Banner previews**

The red rectangle on the following screenshots indicates where banners appear.&#x20;

### **Leaderboard (Header)**&#x20;

Available on all pages above the header.&#x20;

<figure><img src="/files/LGbxh386tRrjTVuAMRvo" alt=""><figcaption></figcaption></figure>

### **Leaderboard (Footer)**

Available on all pages at the bottom of the page, above the footer

<figure><img src="/files/uzUim1Pxce3rBnu7CCSJ" alt=""><figcaption></figcaption></figure>

### **Medium Rectangle & Large Skyscraper**&#x20;

Only available on page templates that contain a sidebar.

<figure><img src="/files/LuphmP00NN8QPM2QHrUt" alt=""><figcaption></figcaption></figure>

## Ad server code

A snippet of code is required to link the ad placements to your ad server.&#x20;

Here is a sample code of the code for the **Medium Rectangle (300x250 pixels) or Large Skyscraper (300x600 pixels)** ad unit.

```
<script async data-cookieconsent="necessary" src="https://securepubads.g.doubleclick.net/tag/js/gpt.js"></script>

<script data-cookieconsent="marketing">
  window.googletag = window.googletag || {cmd: []};
  googletag.cmd.push(function() {
    googletag.defineSlot('/5748/scm.main', [[300, 250], [300, 600]], 'r1301').setTargeting('adloc', ['r1301']).addService(googletag.pubads());
    googletag.pubads().enableSingleRequest();
    googletag.enableServices();
  });
</script>

<!-- /5748/scm.main -->
<div id='r1301'>
	<script>
	  googletag.cmd.push(function() { googletag.display('r1301'); });
	</script>
	</div>
```


# Create a campaign

**Emails allows you to communicate with audiences by distributing campaigns from directly from the Wavecast hub - saving the time of building campaigns and managing audience data within a third-party system.**&#x20;

**The following guide gives an overview of the different types of email campaigns that can be sent, as well as some top tips for success.**

## Email Types&#x20;

Campaigns can be sent to hub or event audiences, either as automated or scheduled emails.&#x20;

Event emails can be created within an event. Go to Events > select your event > Automations > Emails > Manage email campaigns. Hub emails must be created from Emails > Create campaign.

### Automated&#x20;

Automated emails are triggered when a user completes a particular action on the hub. For example, when they create an account or subscribe for an event.

{% embed url="<https://scribehow.com/shared/Trigger_an_email_campaign__43x8CUNETWyvpvlogBFtIw>" %}

### Regular&#x20;

Scheduled emails are sent at a specified date/time. They include reminder emails or to promote on-demand content.

{% embed url="<https://scribehow.com/shared/Schedule_an_email_campaign__xyRdVVtNSIuVRDxRDGk-dQ>" %}


# Customise Email CTAs

Email CTAs are crucial for directing recipients to take specific actions, and the editor provides several intuitive options for tailoring their functionality and design.

### **Inserting a CTA Button**

<figure><img src="/files/3raSSqytQP0OlkX1kQIz" alt=""><figcaption></figcaption></figure>

To add an Email CTA, simply click the **Insert CTA** button in your editor's toolbar. The CTA will be placed wherever your cursor is positioned within the editor.

By default:

* If specific content is linked to the email, the CTA will display the text **"View event"** and use the `content_link_auto_login` as its link.
* If no content is linked, the CTA will default to the text **"View hub"** and use the fallback link `hub_link_auto_login`.

***

### **Interacting with a CTA**

<figure><img src="/files/dus0DpqcNb4srU2D1sZg" alt=""><figcaption></figcaption></figure>

When you insert a CTA using the toolbar, you can hover over the button or link to reveal five customization options. These options allow for easy editing and styling of the CTA:

* **Open Link**\
  Click this option to test and verify the link associated with the CTA. The link will open in a new tab or window.
* **Change Text Color**
  * Updates the text color of the CTA by adding inline styles to the closest anchor (`<a>`) element.
  * There’s no need to highlight the entire text—this option automatically applies the style to the relevant anchor.
* **Change Background Color**
  * Customizes the background color of the CTA.
  * Similar to changing the text color, this adds inline styling directly to the anchor (`<a>`) element, ensuring the change is localized to the CTA.
* **Edit Link**\
  Allows you to modify the URL or action associated with the CTA. This is useful for updating or correcting links.
* **Unlink**\
  Removes the link functionality from the CTA, effectively turning it into plain text or an unlinked button.

***

#### **Customizing Colors**

1. **Text Color**:\
   To change the text color of a CTA, hover over the CTA and select **Change Text Color**. This adds an inline `style` attribute to the closest `<a>` element. Example:

```
<a 
    href="[hub_link_auto_login]" 
    class="button button-blue" 
    target="_blank" 
    rel="noopener noreferrer" 
    style="color: rgb(0, 0, 0);">
        View hub
</a>
```

1. **Background Color**:\
   To change the background color, hover over the CTA and select **Change Background Color**. This modifies the inline `style` attribute of the anchor (`<a>`) element. Example:

```
<a 
    href="[hub_link_auto_login]" 
    class="button button-blue" 
    target="_blank" 
    rel="noopener noreferrer" 
    style="border-color: rgb(255, 255, 255); background-color: rgb(255, 255, 255);">
        View hub
    </a>
```

These changes are immediately visible in the editor and will render in the final email.

***

### **Best Practices**

1. **Use Meaningful Links**: Ensure that the CTA’s destination is clear and relevant to the email’s purpose.
2. **Contrast for Accessibility**: Choose text and background colors with sufficient contrast for readability, ensuring compliance with accessibility standards.
3. **Test Links**: Always use the **Open Link** option to confirm the CTA points to the correct URL.
4. **Avoid Over-Styling**: Use inline styles sparingly to maintain email performance and compatibility across email clients.


# Building Complex Emails

Creating complex and visually appealing emails often requires a structured approach.

Since most email clients rely on **HTML tables** for layout (due to email client compatibility), you'll need to use nested tables to build the background and structure your content. Below is a step-by-step guide:

***

**Step 1: Build the Background of Your Email**

The first step is creating the foundational structure for your email’s background. If your email has distinct color sections, for example:

* **Grey** at the top
* **Red** in the middle
* **Black** at the bottom\ <br>

  <figure><img src="/files/Lv0okwzcYI3tkRF1PLzo" alt=""><figcaption></figcaption></figure>

You’ll need to create a **single-column, three-row table** to represent these sections.

**How to Insert the Background Table**:

1. Click on "More Rich"<br>

   <figure><img src="/files/IxScfudktKkamn2H5U3e" alt=""><figcaption></figcaption></figure>
2. Insert a **single-column table with three rows**.\ <br>

   <figure><img src="/files/XfLWmmX0aWSLN3exxREo" alt=""><figcaption></figcaption></figure>
3. Adjust the background color of each row using the background color button in the editor. To do this, hover over each cell and click "Cell Background"<br>

   <figure><img src="/files/O01DDV4Fp5PKVjqu71vp" alt=""><figcaption></figcaption></figure>

***

**Step 2: Add Nested Tables for Content Structure**

Once the background is in place, add tables inside each row to define the content layout. This is especially important for structuring text, images, and other content. Always insert spacer columns (empty cells) for consistent spacing between elements.

* **Example**: If a section requires an image with some text to appear side by side, you’ll need to:
  1. Insert a **three-column row** within the corresponding background row.
  2. Use the middle column as a spacer between the left and right columns.\ <br>

     <figure><img src="/files/iAymx2BW9V1IoFWM5EJO" alt=""><figcaption></figcaption></figure>

**Adding Nested Tables**:

* Select the desired background row.\ <br>

  <figure><img src="/files/ZcpmUeJGq7WLldXEUM6d" alt=""><figcaption></figcaption></figure>
* Insert another table (e.g., a three-column table) within the row.\ <br>

  <figure><img src="/files/lHPXXPu6ah7P2kdLFtbC" alt=""><figcaption></figcaption></figure>
* Adjust column widths for spacing by click on the column outline.

<figure><img src="/files/Ytx6ni7Os0fcIdFqURYV" alt=""><figcaption></figcaption></figure>

***

**Step 3: Add Content to Each Section**

Now that your structure is ready, you can populate the tables with content:

1. **Text**: Use the text editor to format your copy (e.g., bold headers, aligned paragraphs).\ <br>

   <figure><img src="/files/Qc3Lkntx8bWLtMkh3JZw" alt=""><figcaption></figcaption></figure>
2. **Images**: Use the **Insert Image** button to add images to specific table cells. Make sure to define image sizes for better rendering in various email clients.<br>

   <figure><img src="/files/8sUvaunM0YBQttr9t72U" alt=""><figcaption></figcaption></figure>
3. **Buttons**: Create clickable call-to-action buttons by using our [Insert Email CTA function](/emails/create-a-campaign/customise-email-ctas).

***

**Step 4: Preview and Test Your Email**

Once your email is built:

1. **Preview** it within the editor to ensure all elements are aligned correctly.
2. **Test** your email across multiple email clients (e.g., Outlook, Gmail, Apple Mail) to ensure compatibility. We would reccomend using [Litmus](https://litmus.com).&#x20;

***

#### Tips for Building Emails

* **Use Spacer Columns**: Always insert spacer columns (empty cells) for consistent spacing between elements.
* **Avoid Absolute Positioning**: Email clients don’t handle CSS positioning well. Stick to table-based layouts.
* **Inline Styling**: Use inline styles for maximum compatibility, especially for fonts, padding, and colors.
* **Clean Imported HTML**: If you insert HTML from other sources, be sure to thoroughly clean the code. Many email builders inject their own classes and styles, which can conflict with your design and cause rendering issues across email clients.
* **Save as a Template**: Once you're happy with your email, [save it as a template](/emails/create-a-campaign/email-templates) for future use! This will save time and ensure consistency in your email campaigns.

By following these steps, you’ll be able to create professional and visually appealing emails that render correctly across all email clients.<br>

{% embed url="<https://scribehow.com/embed/How_to_Build_a_Complex_Email__rWSPZgizRQOotL5tuHCk_A>" %}


# Email Segmentation

Rules and options available for segmenting audiences in both automated and regular email campaigns. The segmentation rules enable precise targeting based on user behavior, attributes, and preferences.

### **Segmentation for Automated Emails**

<figure><img src="/files/cBaRPae3Aq0gLjvTHK3O" alt=""><figcaption></figcaption></figure>

When the campaign type is `automated`, the following segmentation options are available:

| Label              | Description                                                                                 |
| ------------------ | ------------------------------------------------------------------------------------------- |
| Field equals       | Targets recipients where a specific field in the sign up form matches a given value.        |
| Field not equal to | Targets recipients where a specific field in the sign up form does not match a given value. |
| With Ticket/Pass   | Targets recipients who have purchased or hold a specific ticket/pass.                       |

***

### **Segmentation for Regular Emails**

<figure><img src="/files/cdRNefdxNbGeooHOdBx9" alt=""><figcaption></figcaption></figure>

When the campaign type is `regular`, a more extensive set of segmentation options is available, grouped into logical sections. Disabled groups are only placeholders and are not selectable by users.

#### **1. Campaigns Section**

| Received a previous email       | Targets recipients who received a previous email.                     |
| ------------------------------- | --------------------------------------------------------------------- |
| Didn't receive a previous email | Targets recipients who did not receive a previous email.              |
| Opened a previous email         | Targets recipients who opened a previous email.                       |
| Didn't open a previous email    | Targets recipients who did not open a previous email.                 |
| Hasn't opened an email since    | Targets recipients who haven't opened an email since a specific date. |
| Clicked a link                  | Targets recipients who clicked a link in a previous email.            |
| Didn't click a link             | Targets recipients who did not click any link in a previous email.    |

#### **2. Content Section**

| **Label**          | **Description**                                                      |
| ------------------ | -------------------------------------------------------------------- |
| Downloaded         | Targets recipients who downloaded a specific piece of content.       |
| Not downloaded     | Targets recipients who did not download a specific piece of content. |
| Watched video      | Targets recipients who watched a specific video.                     |
| Didn't watch video | Targets recipients who did not watch a specific video.               |

#### **3. Data Pots Section**&#x20;

**Sub-Groups**:

* **Interest Preferences**:
  * Has interest preference: Targets recipients with specific interest preferences.
  * Doesn't have interest preference: Targets recipients without specific interest preferences.
* **Audience Group Membership**:
  * In audience group: Targets recipients who are part of an audience group.
  * Not in audience group: Targets recipients not part of any audience group.
* **Email List Membership**:
  * In email list: Targets recipients in a specific email list.
  * Not in email list: Targets recipients not in a specific email list.

#### **4. Events Section**&#x20;

| **Label**                | **Description**                                                                 |
| ------------------------ | ------------------------------------------------------------------------------- |
| Registered Interest      | Targets recipients who registered interest in an event.                         |
| Didn't Register Interest | Targets recipients who did not register interest in an event.                   |
| Subscribed to            | Targets recipients who subscribed to specific content or notifications.         |
| Not Subscribed to        | Targets recipients who are not subscribed to specific content or notifications. |
| With Ticket/Pass         | Targets recipients holding a ticket or pass for an event.                       |
| Checked in               | Targets recipients who checked in to an event.                                  |
| Didn't Check-in          | Targets recipients who did not check in to an event.                            |
| Watched live             | Targets recipients who watched a live session or stream.                        |
| Didn't watch live        | Targets recipients who did not watch a live session or stream.                  |
| Watched on-demand        | Targets recipients who watched on-demand content.                               |
| Didn't watch on-demand   | Targets recipients who did not watch on-demand content.                         |

#### **5. Sign Up Fields Section**&#x20;

| **Label**              | **Description**                                                         |
| ---------------------- | ----------------------------------------------------------------------- |
| Field equals           | Targets recipients where a specific field matches a value.              |
| Field not equal to     | Targets recipients where a specific field does not match a value.       |
| Field contains         | Targets recipients where a specific field contains a substring.         |
| Field does not contain | Targets recipients where a specific field does not contain a substring. |

***

**6. Other Section**

| **Label** | **Description**                       |
| --------- | ------------------------------------- |
| Hub users | Targets recipients who are hub users. |

***

#### **Key Points**

1. **Automated Emails**: Focus on simpler rules based on fields and ticket/pass status.
2. **Regular Emails**: Offer comprehensive segmentation covering campaigns, content engagement, audience groups, and event participation.
3. **Disabled Options**: These are for organizational purposes and cannot be selected by users.

This segmentation framework ensures precise targeting for tailored email campaigns, enhancing engagement and response rates.


# Email Templates

Using email templates ensures consistency and saves time when sending recurring or branded emails. Below is a guide to help you create and manage email templates in your system.

**Step 1: Finalize Your Email Design**

1. Design your email in the editor. Use tables to create the layout, add content, and style your email until it’s perfect.
2. Preview and test the email to ensure it looks great across different email clients.
3. Once you're happy with the email, **switch to the HTML view** to access the code.

***

**Step 2: Copy the Email HTML**

1. In the editor, locate the option to view the **HTML source code**. ("More Rich" > "Code View")\ <br>

   <figure><img src="/files/dNfEDAcJrGlFUfxY87mB" alt=""><figcaption></figcaption></figure>
2. Copy all the HTML code. Ensure you’ve selected everything!

***

**Step 3: Navigate to Email Templates Settings**

1. Go to **Settings** > **Audience** in the system navigation menu.<br>

   <figure><img src="/files/kjH3Y8JTvscXS2b8dvv8" alt=""><figcaption></figcaption></figure>
2. Click on the **Email** section.<br>

   <figure><img src="/files/XMLOHCjqsnY7nRWrCVYq" alt=""><figcaption></figcaption></figure>
3. Find the **Email templates** listing\ <br>

   <figure><img src="/files/bwSymchkNyrnIi7qUfrj" alt=""><figcaption></figcaption></figure>

***

**Step 4: Add a New Template**

1. In the **Email templates** listing, copy the Empty template by clicking on the copy icon.<br>

   <figure><img src="/files/n2T8RexNgt8d5Poi5pr9" alt=""><figcaption></figcaption></figure>
2. Go into edit mode for the new template you just created.<br>

   <figure><img src="/files/ABp88sETjHQw7lryRQtK" alt=""><figcaption></figcaption></figure>
3. Give your template a meaningful name (e.g., “Monthly Newsletter Template” or “Event Invitation Template”) for easy identification.<br>

   <figure><img src="/files/NJ1ZlMM00xkFgCl8ZqgZ" alt=""><figcaption></figcaption></figure>
4. Insert the HTML you copied in Step 2.
5. Save your template.<br>

   <figure><img src="/files/AwxXFk0ss7hwLdR0fWzi" alt=""><figcaption></figcaption></figure>

{% embed url="<https://scribehow.com/embed/Updating_Email_Templates_on_Wavecast__15YjIQidQOmoC8Px_seaLg>" %}

***

**Step 5:** [**Using the Template to Create Emails**](/emails/create-a-campaign)

Once your template is saved, follow these steps to use it:

1. **Create a New Email**: Navigate to the email creation tool and select your template from the available options.\ <br>

   <figure><img src="/files/8EiyC2rgkVBoiKjuYw8E" alt=""><figcaption></figcaption></figure>
2. **Customize the Content**:
   * Replace placeholder text or images with the content for your specific campaign.
   * Make minor adjustments as needed to fit your current email’s purpose.<br>

     <figure><img src="/files/3FaZ41U4LOLi4SGRNi7x" alt=""><figcaption></figcaption></figure>
3. **Send or Schedule**: Test your email, preview it, and send or schedule it for delivery.

***

**Tips for Managing Templates**

* **Organize Templates**: Use consistent naming conventions for templates so they are easy to locate.
* **Update Regularly**: Periodically review your templates to ensure they meet brand guidelines and use the latest design best practices.

By following these steps, you’ll have a library of reusable email templates that streamline your email marketing process.<br>

{% embed url="<https://scribehow.com/embed/How_to_an_Email_Template_in_Wavecast__igoIDSbeTp2kalQiKQ2cAg>" %}


# Organise contacts


# Add email addresses to Lists

{% embed url="<https://scribehow.com/shared/How_to_add_emails_to_email_lists__hMyeLdDwRHOR_WIcOIEc7A?referrer=documents>" %}


# Send a campaign to a list

{% embed url="<https://scribehow.com/shared/How_to_trigger_an_email_for_a_group_of_people__G4Dtu_57SDyWpI2Nwb5BvQ?referrer=documents>" %}


# Advanced Emails


# Crop the email header

{% embed url="<https://scribehow.com/shared/How_to_use_the_email_header_cropper__9zqGRJ0cQGmBY74xb9iptQ>" %}


# Send an event campaign to hub audience

{% embed url="<https://scribehow.com/shared/How_to_make_an_event-specific_email_blast_send_hub-wide__H51VDGoaSdm3dhUfJwN5gg?referrer=documents>" %}


# Adjust user email preferences

{% embed url="<https://scribehow.com/shared/How_to_adjust_user_email_preferences__ZO-L5A98Q1qe5bf82Azi5A?referrer=documents>" %}


# Change reply-to email address

{% embed url="<https://scribehow.com/shared/How_to_change_the_reply-to_address_on_emails__NEq5oUQJSAukNAe1GZBAbQ?referrer=documents>" %}


# Campaign Reports

## View report

**Regular** campaign stats are available after sending.  **Automated** campaign stats appear once setup is complete.&#x20;

## Report data

**Unsubscribers**\
The number of unsubscribers and unsubscribe rate.

**Undelivered**\
The number of undelivered emails and undelivery rate.

**Clicks**\
The number of unique clicks and unique click rate.

**Opened**\
The number of emails opened and open rate.

**Delivered**\
The number of emails delivered and delivery rate.

**Emails Sent**\
The number of emails sent.

Here’s what you’ll see on your overview page: You'll get an overview of your results and additional tabs detailing specific email activities.

<div data-full-width="true"><figure><img src="/files/TLWdE7fu1orwXOzXHXC0" alt=""><figcaption></figcaption></figure></div>

### Troubleshooting reports

If your email results seem incorrect, here are some things to keep in mind:

* Email delivery times can vary based on the number of recipients.
* To track an email open, the recipient must enable image viewing in their email account.
* If most of your recipients share the same domain, the domain administrator might be quarantining the message in their spam filter.
* Click & open rates can sometimes be higher than usual due to email bots clicking links in emails as a security measure. [Read more about Inflated Clicks & Opens](/emails/campaign-reports/inflated-clicks-and-opens).


# Link Clicks

Coming soon!

You can track how many times your links were clicked in an email by navigating to the sent email and selecting the **Clicks** sub-tab.

<figure><img src="/files/x1IU8BsGeS1YLETJcHc9" alt=""><figcaption></figcaption></figure>


# Suppressed

Coming soon!

You can track which emails have been suppressed and why by navigating to the sent email and selecting the **Suppressed** sub-tab.

<figure><img src="/files/TOk1K4MyrKNjK6ASgZeu" alt=""><figcaption></figcaption></figure>


# Recipients

Coming soon!

You can track who recieved an email by navigating to the sent email and selecting the **Recipients** sub-tab.

<figure><img src="/files/fhXLyBUE4tLbABRjyWpS" alt=""><figcaption></figcaption></figure>


# Inflated Clicks & Opens

### Understanding Inflated Click and Open Rates in Email Campaign Reports

Creating and analyzing email campaigns might seem straightforward, but there’s an often-overlooked factor that can significantly skew your data: email bots.

**The Role of Email Click Bots**

Email click bots are automated programs designed to click on links within emails to verify their safety, preventing spam from reaching the recipient’s inbox. While this enhances security, it also means that the clicks recorded may not always represent real human interactions.

**Distinguishing Email Spam Bots from Email Click Bots**

* **Email Spam Bots**: These are malicious programs that send spam emails, spread malware, or engage in ad fraud by generating artificial clicks to inflate metrics.
* **Email Click Bots**: These bots, part of email security systems, click on links within emails to scan for potential threats, thereby inadvertently inflating click metrics.

**Email Security Gateways**

Email security gateways (or spam filters) scan inbound emails for threats, often by clicking on links within the emails. This scanning can lead to a high number of fake clicks, distorting your metrics.

**Impact on Email Campaign Metrics**

* **All Emails Are Affected**: Bot activity can skew your data regardless of the email service provider you use.
* **High Click Rates from Single Domains**: An unusually high number of clicks from a single domain may indicate bot activity rather than genuine user engagement.

#### Why Some Campaigns Are More Affected Than Others

1. **Content Type**:
   * **Promotional vs. Informational**: Promotional emails with numerous links and calls to action (CTAs) are more likely to be scanned by bots compared to simple informational emails.
   * **Attachment Inclusion**: Emails with attachments or links to downloads are often scrutinized more by security systems, leading to higher bot activity.
2. **Target Audience**:
   * **Corporate Recipients**: Emails sent to corporate domains are more likely to go through stringent security filters compared to those sent to personal email addresses.
   * **Geographical Differences**: Certain regions may have more rigorous email security practices, impacting email campaigns differently based on the recipient's location.
3. **Frequency and Volume**:
   * **High-Frequency Campaigns**: Campaigns that are sent frequently may trigger more aggressive scanning from security systems.
   * **Large Recipient Lists**: Larger email blasts are more likely to encounter varying security measures, increasing the likelihood of bot clicks.
4. **Link Density**:
   * **Number of Links**: Emails with a higher number of links are more likely to attract bot clicks as each link is checked for security purposes.
   * **Type of Links**: Links directing to unfamiliar or non-mainstream websites might be more frequently checked by security bots.
5. **Past Interaction History**:
   * **Previous Engagement**: Campaigns sent to recipients with a history of high engagement might be flagged for additional security checks.
   * **Blacklist/Whitelist Status**: Emails from domains that are not whitelisted by recipients' email servers may be subject to more rigorous scanning.


# Engage audiences

**This section explains how to prepare audience engagement features and what happens on live day.**

## **Getting to know the&#x20;*****Postbox*****&#x20;and&#x20;*****Live Feed***

Audience engagement centres around the live feed and the postbox.&#x20;

* **Live feed** is a curated timeline of what's been happening at an event that allows audiences to follow along.&#x20;
* **Postbox** is how audiences make their contribution to the live event. It is where questions are submitted to speakers or comments are posted.&#x20;

They are key components of an organiser's toolkit. Using them to create an engaging experience for the audience requires consideration in the planning stages.

Both enable the following:

* [**Audience Q\&A**](/live/engage-audiences/audience-q-and-a)**:** The audience submits questions to the speakers using the postbox
* [**Comments**](/live/engage-audiences/audience-q-and-a): The audience posts comments using the postbox.&#x20;
* [**In-feed graphics**](/live/engage-audiences/in-feed-graphics): Organisers post images to create an attractive experience.&#x20;
* [**Polls**](/live/engage-audiences/polls): Take the temperature of audience views with multiple choice questions and live results.&#x20;
* [**Quotes**](/live/engage-audiences/quotes): Admins share top comments from speakers&#x20;
* [**Related Content**](/live/engage-audiences/related-content): Promote additional content for to explore.&#x20;

By default, the live feed and postbox appear below the video player on a *Live* page template.

### Setup the postbox and live feed

The postbox is used for the audience to type and send questions or comments. &#x20;

The live feed is a section of the page where content appears chronologically.&#x20;

{% embed url="<https://scribehow.com/shared/Enabledisable_postbox_or_live_feed__camLFnFfTg6GhCK85CoWyg>" %}

## Using audience input within a live event

### Presenter View

Presenters who are on-screen or on-stage can view comments and questions submitted through the postbox on a public link.&#x20;

This clean, simple webpage is designed to be easy for presenters to use, free from distraction and without having to be logged into the admin interface.&#x20;

Presenter View is a public link accessible on any desktop, mobile or tablet device. It is typically used by moderators or speakers that plan to refer to audience questions.&#x20;

{% hint style="info" %}
To help speakers to focus, admin users can moderate audience questions and select which are added to *Presenter View*. [Find out more](/live/engage-audiences/audience-q-and-a).&#x20;
{% endhint %}

### Broadcast View

Broadcast View is a public link where results of audience polls can be displayed.&#x20;

Broadcast engineers can access polls on Broadcast View to incorporate them into a live broadcast.

To use this feature, admin users add the polls by selecting the screen icon.&#x20;

{% hint style="info" %}
[Read our full guide](/live/engage-audiences/polls) about using polls in a live event.&#x20;
{% endhint %}

<figure><img src="/files/29Fn8WWDm11KeH4PQJxQ" alt=""><figcaption></figcaption></figure>


# Audience Q\&A

Follow this guide to allow, configure and moderate audience posts for Q\&A or comments.&#x20;

{% embed url="<https://scribehow.com/shared/How_to_manage_comments_from_the_QandA_box__c9irkU8CQYu1t660ssVvLw>" %}


# In-Feed Graphics

Graphics of any dimension can be published within the live feed.&#x20;

They are typically used for:

* Banner ads
* Promotional content
* Related whitepapers
* External resources
* Sponsor visibility

{% hint style="info" %}
There are no size restrictions, however, letterbox dimension is optimal with a ratio of 3:1 i.e. 1200px x 400px
{% endhint %}

{% embed url="<https://scribehow.com/shared/Manage_in-feed_graphics__CtoTMtFXTCqDmaBJmjEfQQ>" %}


# Polls

Polls are multiple choice questions on which audience members can vote from the live feed.&#x20;

They are used to:

* conduct surveys
* gain audience insights
* collect votes
* call-to-actions / opt-ins (e.g. receive more resources)

{% embed url="<https://scribehow.com/shared/Create_publish_and_display_results_of_polls__D4YXG8pKTjm1r_koDJox6g>" %}


# Quotes

Quotes are posts in the live feed that attribute comments to a speaker's profile.&#x20;

They curate the key ideas and comments from a live event or campaign.&#x20;

{% embed url="<https://scribehow.com/shared/Publish_and_unpublish_speaker_quotes__yY3bO8n6RJSfEHzB9WxOwQ>" %}


# Related Content

{% embed url="<https://scribehow.com/shared/How_to_publish_content_and_speaker_profiles_to_your_live_feed__ty1Sn5A2RxSd8IF1lCZWvw>" %}


# Networking

Coming soon!


# Meeting Rooms

Coming soon!


# Deliver live content


# Slides

When presenting slides in a live broadcast, it is often assumed speakers will use PowerPoint or screenshare on Zoom. In fact, speakers control slides on a public link supplied from Wavecast.

It allows the broadcast engineer to ingest the slides into the broadcast in a controlled manner.&#x20;

## Slide preparation

Observe the following guidelines when preparing slide content:

* Create slides in your usual software e.g. PowerPoint or Keynote.
* When uploading slides to Wavecast, they must be in PDF format.
* Slide animations are not recommended for a live broadcast. Should they be required, it is advisable to book a pre-recording session in order to capture the content in advance.&#x20;
* Organisers may wish to notify their speakers in advance that slides will be operated on a Wavecast link and that animations are not supported.
* The slide tool link should be circulated in advance, so your speakers can familiarise themselves with controlling the slides.

## Upload and operation

Follow this guide to create, upload and operate a slide deck.&#x20;

{% embed url="<https://scribehow.com/shared/How_to_create_a_slide_deck__dpcR_Yb3Tia3IukwdzU9MQ>" %}


# Troubleshooting for audiences

Below are the frequently asked questions from audience members that solve common problems as quickly as possible.&#x20;

{% hint style="info" %}
Publishing an FAQs page on your website helps audiences understand how to take part in the live experience and prepare ahead of time.&#x20;
{% endhint %}

<details>

<summary>I am having trouble signing up for an account.</summary>

Before the client begins the sign-up process again, verify the following with them:&#x20;

* You are using Google Chrome or the latest Microsoft Edge (Version 86.0 or higher).&#x20;
* You have disabled any VPNs you are using.&#x20;
* You have disabled any extensions installed on your browser.
* Your company firewall isn't blocking our website.&#x20;
* Your internet speed is sufficient (at least 25 Mbps).&#x20;

</details>

<details>

<summary>What does the error "The email must be a valid email address" mean?</summary>

![](/files/BqiCXVRKn0WF40lEeq9w)

If your user is seeing the message "The email must be a valid email address" when they try to create an account, please email us at <clients@wavecastpro.com> with the email address of the affected user. &#x20;

We will need to manually clear the email validation cache. This is because when users try to register on the site, we run the email address through a third-party service to validate it. This is very important to keep the data clean and to avoid email delivery issues. If we have a lot of emails bouncing, our reputation goes down, and the delivery is affected. The email address is validated based on: Mailbox detection Syntax checks (RFC defined grammar) DNS validation Spell checks Email Service Provider (ESP). We only run the validation checks once every 30 days for each email address. The issue with email validation usually happens when there is a temporary issue with the DNS for the domain, which causes the validation to fail. As it is cached for 30 days, the invalid state persists.

</details>

<details>

<summary>I cannot access the event. What do I do?</summary>

Please check the following on the system:&#x20;

* The client has an account created on the system.&#x20;
* Their email domain is not present on one of your blacklists.&#x20;

Before the client begins their registration again, verify the following with them:&#x20;

* You are using Google Chrome or the latest Microsoft Edge (Version 86.0 or higher).&#x20;
* You have disabled any VPNs you are using.&#x20;
* You have disabled any extensions installed on your browser.
* Your company firewall isn't blocking our website.&#x20;
* Your internet speed is sufficient (at least 25 Mbps).&#x20;

</details>

<details>

<summary>I am not receiving emails.</summary>

* Get the user to check their spam folder for the email.&#x20;
* Check that the email the user expected to receive is activated (for automated emails) or sent (for regular emails).&#x20;
* If the email was expected to be sent after import, *Trigger emails and/or integrations* may have been left unticked. Re-import the affected users and ensure the trigger option is checked.&#x20;
* Check the user is [not on the suppressed lis](/emails/campaign-reports/suppressed)[t ](/emails/campaign-reports/suppressed)for the email activated and/or sent.

</details>

<details>

<summary>Can you send me my auto-login link?</summary>

Follow these instructions to generate the auto-login link for a user.&#x20;

1. On your hub, click **Event** > **Audience** > *Users*
2. Search for the user.
3. Copy the Auto-login displayed under the user email.\
   For example. *?\_luser=123456.*
4. Attach the Auto-login to the end of your event live page URL to share with the user. This will log your user in directly to their account.

</details>

## Advanced Troubleshooting

{% hint style="info" %}
Please note Wavecast provides technical support to clients but is not able to provide technical support directly to audiences.&#x20;
{% endhint %}

To contact us, email us at <clients@wavecastpro.com> or use the support chat and provide us with the following information:&#x20;

* A detailed description of the steps you took to sign up, including any pages and/or emails where you clicked on any links.&#x20;
* Which Browser you are using.&#x20;
* Which version of Browser you are using.&#x20;
* Your Operating System is.&#x20;
* Screenshots of the issue.


# Remote Production

An overview of Wavecast's remote production services.

{% content-ref url="/pages/E5raopajdRGGaU1MafbA" %}
[Live Broadcast](/live/remote-production/live-broadcast)
{% endcontent-ref %}

{% content-ref url="/pages/M3nv6ZvafHRYOmT9D4x7" %}
[Enterprise Streaming Support](/live/remote-production/enterprise-streaming-support)
{% endcontent-ref %}

{% content-ref url="/pages/6QcHeEZKisaNXd9dSnxG" %}
[Video & Audio Production](/live/remote-production/video-and-audio-production)
{% endcontent-ref %}


# Live Broadcast

## What is a live broadcast?

A live broadcast is a remotely produced online event where all or part of the audience are remote. &#x20;

Wavecast's remote production services provide a fully-managed solution for premium webinars and bespoke online events that require:

* elevated production values
* brand consistency
* technical complexity
* combination of live and pre-recorded content
* additional team capacity&#x20;

## Find out more

The following guide provides information about who is involved, what happens next and how to ensure things run smoothly.

{% content-ref url="/pages/wCTbltvUPl393TVlJYE2" %}
[Book a live broadcast](/live/remote-production/live-broadcast/book-a-live-broadcast)
{% endcontent-ref %}

{% content-ref url="/pages/3j4FOGf00DUhLlzHSBi3" %}
[Prepare for a live broadcast](/live/remote-production/live-broadcast/prepare-for-a-live-broadcast)
{% endcontent-ref %}


# Book a live broadcast

What to expect when booking a remotely produced, premium online event with Wavecast.

## Make a booking

{% tabs %}
{% tab title="Email" %}
[Send us an email](https://share-eu1.hsforms.com/1NBSPTqBQTdCAwh8yx5_Lbgfrf4o).&#x20;
{% endtab %}

{% tab title="Chat" %}
Start a webchat. Go to [publish.wavecast.io](https://publish.wavecast.io) and select the :speech\_balloon:icon in the bottom left.&#x20;
{% endtab %}

{% tab title="Phone" %}
Call +44 (0) XXX XX XX XX to speak to a member of the team.&#x20;
{% endtab %}
{% endtabs %}

## What is a live broadcast?

A live broadcast is a remotely produced online event where all or part of the audience are remote. &#x20;

The following guide provides information about who is involved, what happens next and how to ensure things run smoothly.

## What to expect from us:

Every live broadcast will have the following team members assigned:&#x20;

* **Wavecast Producer**: Main point of contact for project management and day-to-day support.
* **Wavecast Engineer**: Technical specialist that delivers the live broadcast, including speaker onboarding and technical checks, mixing video, graphics and slides.

As standard, the following are supplied:

* **Broadcast graphics**: Brand-specific namestraps, session slate and end slate. &#x20;
* **Speaker green room link(s)**: For speakers who will join the broadcast remotely, a link to "backstage" where all speakers and the Wavecast Engineer will be present.&#x20;
* [***Slides***](/live/deliver-live-content/slides) **link**: A webpage where slide decks are uploaded in PDF in order to be mixed into the live broadcast.&#x20;
* [***Presenter View***](/live/engage-audiences#presenter-view) **link**: A webpage where the presenter/moderator can view Q\&A or comments from the audience.&#x20;
* **On-demand session video**: The final recording of the session, top and tailed with session slates.&#x20;

## What we need from you:

* Main point of contact
* Event title
* Event date and time
* Session format, such as panel and/or presentation
* Speaker details
* Logos
* Event image
* Slides
* Any additional video content


# Prepare for a live broadcast

## Introduction

This guide contains information on what to expect when participating in a live broadcast, including some simple checks to perform in advance.&#x20;

## What to expect from us:

* 30 minutes prior to going live, the Wavecast Engineer will greet the speaker(s) in the green room.&#x20;
* The Engineer will conduct a speaker briefing including camera and mic checks. This is an opportunity for speakers to check through slides, discuss the flow and ask any technical questions they may have.&#x20;
* A preview of the live output will be available via the green room. Speakers should avoid monitoring the broadcast via the audience platform, as they will experience a delay.
* The Engineer will mix the speakers, graphics, slides and any additional video content.
* Once the broadcast finishes, the Engineer will take the speakers off air and will confirm once it’s safe to exit the green room.&#x20;
* The Producer will share the session recording for you to circulate or publish as suits you. If you are hosting the video via a Wavecast hub, the Producer will publish it for you.

## What we expect from you:

To help with a stress-free experience, speakers should complete the following simple checks when joining a live broadcast:&#x20;

* Position yourself in a quiet, well lit room.&#x20;
* Use a laptop or desktop computer, not a mobile or tablet, to join the green room - and ensure it's plugged in to the power.&#x20;
* Use headphones, as audio from the device's speakers may cause interference. &#x20;
* A standard webcam is sufficient, with the recommended resolution of 720px.&#x20;
* Check the web browser is up-to-date.
* Check you have a reliable internet connection.&#x20;
* Join the green room promptly. It may be worth checking the application is up-to-date in advance of the join time.&#x20;
* Silence mobile devices and laptops. Disconnect unnecessary bluetooth devices.&#x20;
* Close all programs that you don’t need during the broadcast.
* Try to position your notes within your natural eyeline, so you are looking to the camera as much as possible, rather than off to the side or below.

{% hint style="info" %}
For added peace of mind, technical rehearsals are available as an additional service. [Make an enquiry](/#contact-support).&#x20;
{% endhint %}


# Enterprise Streaming Support

Wavecast provides enterprise streaming support to production agency partners delivering hybrid events and studio broadcasts.

## What is Enterprise Streaming Support?

Enterprise streaming support is a remote service that monitors the stream quality of event broadcasts delivered through Wavecast servers. &#x20;

Wavecast collaborates with in-venue production teams to provide this specialist expertise.&#x20;

{% hint style="info" %}
We take streaming seriously. [Enquire about support for your next hybrid event](/#contact-support).&#x20;
{% endhint %}

## Find out more

{% content-ref url="/pages/HPiUVv547IioMy8SHDT1" %}
[Conduct a stream test](/live/remote-production/enterprise-streaming-support/conduct-a-stream-test)
{% endcontent-ref %}


# Conduct a stream test

Wavecast provides enterprise streaming support for live event broadcasts. As part of this service, a stream test is required in advance of the live event.

## What is a stream test?

A stream test simulates live event conditions by transmitting video and audio content from the venue to the streaming server. It is an essential part of the preparation to ensure a high-quality broadcast.&#x20;

During a stream test, we complete a number of checks to troubleshoot issues prior to the broadcast, including:&#x20;

* Hardware and software configuration
* Network connectivity
* Audio and video quality
* Verify backup systems are providing redundancy
* Measure latency
* Check accuracy of monitoring systems

## What to expect from us:&#x20;

For every hybrid event, you can expect us to:&#x20;

* Supply RTMP links&#x20;
* Supply links to your transcoder previews&#x20;
* Monitor streams&#x20;
* Provide live broadcast feedback throughout&#x20;
* Test Video for each stream&#x20;

## What we need from you:&#x20;

We recommend the following requirements for all broadcasts: &#x20;

* At least 2 x Encoders&#x20;
* A minimum internet provision of 20 mbps symmetric bandwidth per stream unless remote contribution is used (Zoom etc.) then 40 mbps is recommended.

|                         |                                    |
| ----------------------- | ---------------------------------- |
| Format                  | H264                               |
| Bitrate                 | Variable Bit Rate (VBR)            |
| Video Bitrate           | 6,000 kbps                         |
| Frame Size              | Full HD 1920 x 1280                |
| Frame Rate              | 25 FPS / 30 FPS                    |
| Keyframe Interval (GOP) | 2 seconds or a GOP of framerate x2 |
| Profile                 | Baseline                           |
| Audio Format            | AAC (Stereo)                       |
| Audio Bitrate           | 192 kbps                           |
| Audio Sample Rate       | 48,000 Hz                          |

## Stream Test

Follow this procedure when conducting a stream test.

{% embed url="<https://scribehow.com/shared/Conducting_a_stream_test_with_Wavecast__7DYyCVWcQBWDrjcqotbPwQ>" %}

## How to monitor the stream&#x20;

Using the links provided to your transcoder previews, you’ll be able to view the following data:&#x20;

### Preview Tab&#x20;

Here you can monitor the audio and video that you’re sending to the stream.

<figure><img src="/files/RMZiSe622kyeIdR9z8xS" alt=""><figcaption></figcaption></figure>

### Health Tab&#x20;

Here you can view in depth analytics relating to your connection with us.

<figure><img src="/files/BjmIBJkEFbASYqUqNsQ3" alt=""><figcaption></figcaption></figure>

### &#x20;

<details>

<summary>If I stream, am I live?</summary>

By default when a connection is established, it won’t be live until we make it live at our end. &#x20;

We will liaise with you as to when you’re ready for your stream to be accessible by delegates, we would recommend that this is done 30 minutes prior to the events advertised start time.&#x20;

</details>

### Once the broadcast has finished&#x20;

Once you’re ready to stop streaming and you’ve let us know, we will stop our transcoders. It’s important that you do not stop your encoders before we’ve stopped things here. This is down to maintaining any backup recordings are free from corruption.&#x20;

### Troubleshooting&#x20;

Below is an example of an inconsistent keyframe interval. Drops in the keyframe interval \[blue] or frame rate \[red] are indicative of either encoder or connection performance.&#x20;

In our experience keyframe interval spikes as shown below tend to indicate poor connection performance and frame rate spikes tend to be indicative of poor encoder performance.

<figure><img src="/files/rLx2Ou8mrAPnu7m5cFyr" alt=""><figcaption></figcaption></figure>


# Video & Audio Production

Remote production is a fast, cost-effective method for capturing video or audio content where the following is required: &#x20;

* Pre-recorded content to include as part of a live broadcast
* Record and/or edit podcasts
* Combine video/audio with graphics for social media distribution
* Repurposing of long-form session video/audio into clips

{% hint style="info" %}
To record content in-person, [enquire about our on-site video capture services](/#contact-support).&#x20;
{% endhint %}

## Find out more


# Book remote video production

What to expect when booking a remote video recording session with Wavecast.

## Make a booking

{% tabs %}
{% tab title="Email" %}
[Send us an email](https://share-eu1.hsforms.com/1NBSPTqBQTdCAwh8yx5_Lbgfrf4o).&#x20;
{% endtab %}

{% tab title="Chat" %}
Start a webchat. Go to [publish.wavecast.io](https://publish.wavecast.io) and select the :speech\_balloon:icon in the bottom left.&#x20;
{% endtab %}

{% tab title="Phone" %}
Call +44 (0) XXX XX XX XX to speak to a member of the team.&#x20;
{% endtab %}
{% endtabs %}

## What is remote video production?

Remotely produced video is where a Wavecast Engineer captures speaker(s) content over a video conference platform, such as Zoom, and edits it into a final video package.&#x20;

It is an efficient method to pre-record content for live broadcasts, repurpose long-form video or produce cost-effective branded video for marketing and social media distribution.&#x20;

## What to expect from us:

* Recording session meeting link to share with your speakers.
* Graphics - these will be created once design assets and speaker details are received. They should be signed off ahead of the recording.
* The Engineer will facilitate the recording and carry out the edits.

## What we need from you:

* Proposed recording time and date.
* Deadline for final version of video.
* Approx duration of video.
* Session format (fireside chat, presentation, panel discussion).
* Video format (event session, social post).
* No. of speakers and details for name straps (name, title, organisation).
* If being used, presentation slides to be submitted as a pdf to ensure formatting is maintained.
* Any other video content to include in the edit (MP4 files).
* Share a script if your speakers are following one.

## Recordings with graphics

Graphics will be created in advance of your recording session and applied during the edit. The standard graphics pack includes:

* Namestraps
* Session slate
* End slate

If you have any custom graphics of your own, these can be incorporated. Please liaise with your Producer in advance.&#x20;

## Frequently Asked Questions

<details>

<summary>How many speakers can join a recording?</summary>

Up to 8 x speakers can join a recording.

</details>

<details>

<summary>Can I use slides?</summary>

Yes, you can use slides by following [these instructions](/live/deliver-live-content/slides).

</details>

<details>

<summary>How long is the recording session?</summary>

For 30mins of content, allow 60mins for the recording. For 60mins of content, allow 90min recording time.&#x20;

</details>

<details>

<summary>Can I include other video?</summary>

Yes, please supply this to the Producer in advance of the recording session.&#x20;

</details>

<details>

<summary>How many rounds of edits are included?</summary>

Two rounds of edits are included.&#x20;

</details>

<details>

<summary>What's the cost for additional edits?</summary>

Additional edits are charged at £75/hr + VAT.

</details>

<details>

<summary>Have you got an example of the graphics?</summary>

Ask your Producer for an example graphics pack.

</details>

<details>

<summary>Can you reformat for Instagram or TikTok?</summary>

Yes, but please notify us in advance that this will be required as it will affect how the speaker should be positioned in the recording.&#x20;

</details>


# Prepare for remote video recording

## Introduction

This guide provides speakers with information on what to expect when participating in a remote video recording session, including some simple checks to perform in advance.&#x20;

## What to expect from us:

* The Wavecast Engineer will greet the speaker(s) on the meeting link.
* The Engineer will conduct a speaker briefing including camera and mic checks. This is an opportunity for speakers to check through slides, discuss the flow and ask any technical questions they may have.&#x20;
* The Engineer will make edit notes throughout the recording.&#x20;
* Once the recording session has finished, the Engineer will mix the speakers, graphics and any additional video or slides content.
* The Producer will share the recording for you to circulate or publish as suits you.&#x20;

## What we expect from you:

To help with a stress-free experience, speakers should complete the following simple checks when joining a recording session:&#x20;

* Position yourself in a quiet, well lit room.&#x20;
* Use a laptop or desktop computer, not a mobile or tablet, to join the green room - and ensure it's plugged in to the power.&#x20;
* Use headphones, as audio from the device's speakers may cause interference. &#x20;
* A standard webcam is sufficient, with the recommended resolution of 720px.&#x20;
* Check the web browser is up-to-date.
* Check you have a reliable internet connection.&#x20;

## How the edit process works

1. The first edit of the video file will be shared via a link within one business day of the recording session. This version will be edited as per notes taken during the recording session.
2. Please share this with all stakeholders involved in the approval process and collate the feedback. Provide it to the Producer, along with the correlating time stamps.&#x20;
3. To avoid contradictory editing notes, the feedback should be channelled through one person.
4. The second version of the video will then be shared with you within two business days of receiving your feedback.
5. Following this, share any further comments for your second round of amends.&#x20;
6. Once you’re happy with the edit, please approve via email so we know the project is complete.
7. The final file will be shared with you for download and distribution. When downloading, always select the Uncompressed version.

{% hint style="info" %}
Two rounds of edits is sufficient in most cases - but if you need more, we provide transparent hourly pricing for additional edits.&#x20;
{% endhint %}

## Frequently Asked Questions

<details>

<summary>How do I present slides?</summary>

Follow [these instructions](/live/deliver-live-content/slides).

</details>

<details>

<summary>What if I make a mistake during the recording session?</summary>

No problem! If you stumble or wish to repeat any of the content, just notify the Engineer.

</details>

<details>

<summary>What platform do I need to join for recording?</summary>

We use Zoom as standard as it provides the highest audio and video quality. If you require an alternative, please contact the Producer.

</details>


# On-Site Production

{% hint style="info" %}
Further details on our on-site production services will be available soon.&#x20;
{% endhint %}

{% tabs %}
{% tab title="Email" %}
[Send us an email](https://share-eu1.hsforms.com/1NBSPTqBQTdCAwh8yx5_Lbgfrf4o).&#x20;
{% endtab %}

{% tab title="Chat" %}
Start a webchat. Go to [publish.wavecast.io](https://publish.wavecast.io) and select the :speech\_balloon:icon in the bottom left.&#x20;
{% endtab %}
{% endtabs %}


# Check-in App

**Wavecast Event Manager is an essential app for in-person events, providing attendee check-in, registration and badge printing. Organisers gain a holistic view of audience engagement by bringing together on-site attendance figures, live viewers data and on-demand consumption.**&#x20;

{% hint style="info" %}
This app requires a Wavecast username and password as it is designed for admin users only and not audience members.
{% endhint %}

## Installation

**Download for Apple iOS**

1. Open the AppStore
2. Search "Wavecast Event Manager" or [download](https://apps.apple.com/gb/app/wavecast-event-manager/id1607286340%20).
3. Once installed, enter your Wavecast admin username and password to login.&#x20;

## **Enable check-in**

Go to **Events** > select your event > edit **Overview** > enable **Check-in**.

The event will display within the mobile app.&#x20;

## **How to use**

The app is designed to be easy-to-use during busy registration, with clear buttons to guide the on-site team:

* **Scan QR code**: Opens the device's camera to scan. Each user has a QR code generated when they create an account. The code applies to the user, rather than the ticket. QR codes can be added to email campaigns, for easy retrieval from the reminder emails. The QR code can also be accessed from My Events in the Profile section of the hub. &#x20;
* **Add walk in**: Register someone for the event. A brief version of the sign-up form is displayed for entering the details of an attendee that is not in the list. The user will be prompted to complete any additional required sign-up fields the next time they sign-in to the hub. Ticket selection is not supported within the check-in app, therefore if payment is required to gain entry registration should be completed through the event website.&#x20;
* **Search**: Find individuals in the attendee list. You can search for a user that is registered for the event or has an account on the hub. You can filter the search results listing to view only those who are checked in. The total number of results is displayed at the top. \ <br>

## **Offline mode**

If poor internet connectivity is causing the app to run slowly, enable offline mode.&#x20;

This function will allow event registration to occur without an active internet connection. All check-in and new registration activity is stored on the app until an active internet connection is restored, when the data is synced back to the hub. Live engagement reporting will not available for check-ins captured when the app is operating in offline mode.

## **Languages**

The app supports events that are published in any language. The data on the app shows in the primary language of the event. <br>

## **Badge printing**

To print badges directly from the app, a badge template must be stored on the printer.&#x20;

Creating a badge template requires designer software from the printer manufacturer.

Setup is only required once for each printer or when a new badge template is required.

The following Wavecast fields are supported in badge templates:

| Field             | Description                                                      |
| ----------------- | ---------------------------------------------------------------- |
| HubId             |                                                                  |
| HubTitle          |                                                                  |
| EventId           |                                                                  |
| EventTitle        |                                                                  |
| EventSubTitle     |                                                                  |
| AttendeeId        |                                                                  |
| AttendeeEmail     |                                                                  |
| AttendeeFirstName |                                                                  |
| AttendeeLastName  |                                                                  |
| AttendeeName      | AttendeeFirstName and AttendeeLastName with a space between them |
| AttendeeCompany   |                                                                  |
| AttendeeJobTitle  |                                                                  |

## **Setup with Zebra printers**

1. [Download and install](https://www.zebra.com/gb/en/products/software/barcode-printers/print-dna/zebra-designer.html) Zebra Designer software
2. Connect the Zebra printer to the PC/Mac where Zebra Designer is installed
3. Create a badge template (a list of supported fields is above).
4. Save the badge file to the printer with the filename "NAMEBADGE.ZPL"
5. You are now ready to connect the app to the printer.&#x20;

## **Setup with Brother printers**

{% embed url="<https://youtu.be/QADNwQYa2NQ>" %}

1. [Download and install](https://support.brother.com/g/b/downloadtop.aspx?c=gb\&lang=en\&prod=lpql810weuk) Brother P Touch Editor software
2. Connect and install the Brother printer on the PC where P Touch Editor is installed
3. Create a badge template (a list of supported fields is above).
4. Save the badge file to the printer with the filename "NAMEBADGE"
5. You are now ready to connect the app to the printer.&#x20;

## **Printing from the app**

To connect the printer, your mobile device will need to be connected to Wifi. Open the app and go to “Settings” and then “Manage Printer”. This will scan the network and return a list of printers that can be connected to. Selecting one will connect and check that the badge file exists. \
\
An error will be shown if the app cannot find the badge template. Repeat the process to create and save the badge template as above.&#x20;

{% hint style="info" %}
Bluetooth connectivity is not supported for Zebra printers.&#x20;
{% endhint %}

Once connected, the app can be used to print badges. On the “attendee details” screen, a "print" button appears in the top right. Pressing this will print a name badge with the attendee and event details within the badge template.\
\
The app constantly refreshes to check the status of the printer. The icon will show green when the device is ready to print.&#x20;

<figure><img src="/files/f70Y5dLrs73XY2qKadIt" alt=""><figcaption></figcaption></figure>

The printer icon will display a yellow dot on the print button if there is in error. Common printer errors that could cause the status to change can be “head open”, “paused”, “out of paper”, or “out of ribbon”. If the printer is in any of these states then the yellow dot is shown and pressing the print button will go to the manage printer screen which will display the actual issue.

<div><figure><img src="/files/HvMeCnP6kc231mi3qVwd" alt=""><figcaption></figcaption></figure> <figure><img src="/files/35NEbOEUxbPvz4XwXhIU" alt=""><figcaption></figcaption></figure></div>

<br>


# Dashboard

{% hint style="info" %}
There is limited information on this page whilst we upgrade our analytics to make them more user-friendly and actionable. [Contact support](/#contact-support) for further assistance.&#x20;
{% endhint %}

## Dashboard > Overview

Select Dashboard > Overview from the navigation.&#x20;

<figure><img src="/files/yale7mNWxm9UFYK1DiNH" alt=""><figcaption></figcaption></figure>

| Card Title                   | Description                                                     |
| ---------------------------- | --------------------------------------------------------------- |
| Active users in last 30mins  | Number of users on the hub.                                     |
| Pages visited in last 30mins | Pages visited and ranked based on total visits.                 |
| Accounts                     | Number of accounts created.                                     |
| Event Registrations          | Number of unique subscriptions to events.                       |
| Page Views                   | Total and unique page views.                                    |
| Live Views                   | Total and unique live views                                     |
| Video On-Demand              | Total video views and minutes watched.                          |
| Downloads                    | Total count of downloads of documents.                          |
| Page Views                   | Trend chart for total and unique page views.                    |
| Sign-ups                     | Trend chart for user account creation.                          |
| Logins                       | Total and unique count of user sign-ins.                        |
| Most Popular Mixed Content   | Ranking of most popular content, across all content types.      |
| Most Downloaded Documents    | Ranking of most popular documents based on number of downloads. |
| Most Watched Videos          | Ranking of most popular video based on number of views.         |


# Engagement Report

{% hint style="info" %}
There is limited information on this page whilst we upgrade our analytics to make them more user-friendly and actionable. [Contact support](/#contact-support) for further assistance.&#x20;
{% endhint %}

The engagement report summarises audience engagement and event performance after a live event is completed.&#x20;

## Access an engagement report

This guide shows how admin users can locate an engagement report for an event. Note that the report itself is available on a public link, allowing for it to be sent to stakeholders that do not have admin access.&#x20;

{% embed url="<https://scribehow.com/shared/How_to_find_my_engagement_report__RA0CVynlSRCJqvM_YoNGvg>" %}

## Understanding an engagement report

{% embed url="<https://scribehow.com/shared/How_to_interact_with_your_engagement_report__omMsq7QMSVy1SGiuBzw6HQ>" %}

## Download an engagement report

{% embed url="<https://scribehow.com/shared/How_to_download_my_engagement_report__fhfCc19VQ5m7OvW37Xn1Gg>" %}

## Frequently asked questions

<details>

<summary>Why aren't my live viewers pulling through?</summary>

Please check that you start time and end time have been correctly set on your event, including on your Zoom event if you set up an integration to pull through this information.

</details>


# 2024 (BETA)

Coming soon!


# Google Analytics

This guide provides a step-by-step process for setting up Google Analytics 4 (GA4) on your website, including how to integrate tracking in compliance with GDPR requirements. You'll learn how to create a GA4 property, find and use your Measurement ID, and configure your tracking code to activate only after user consent is given. This document also explains how GDPR compliance may impact data accuracy due to cookie consent restrictions.

For additional support, refer to these helpful resources:

* [How to find your Measurement ID](https://support.google.com/analytics/answer/12270356)
* [How to enable User ID tracking in GA4](https://support.google.com/analytics/answer/3123666)

## Setting Up Google Analytics 4 (GA4)

#### Step 1: Create a Google Analytics Account

1. Go to [Google Analytics](https://analytics.google.com/) and sign in with your Google account.
2. Click on **Admin** in the lower-left corner.
3. Under **Account**, select **Create Account** and follow the prompts to set up your account name and configure data sharing settings.

#### Step 2: Create a GA4 Property

1. After creating the account, click **Create Property**.
2. Enter the **property name**, select the **reporting time zone**, and **currency**.
3. Follow prompts to configure business details, then click **Create**.

#### Step 3: Get Your Measurement ID

1. In your GA4 property, go to **Data Streams** and select **Web**.
2. Enter your website URL and a stream name, then click **Create Stream**.
3. In the stream details, locate the **Measurement ID** at the top right (it starts with "G-").
4. Copy this Measurement ID — you’ll need it to set up tracking on your site.

#### Step 4: Add the Tracking Code with Cookie Consent Tag

1. Open **Wavecast Publishing** to your *Settings* > *Analytics* page.\ <br>

   <figure><img src="/files/cwZ85sYigy5mbrcloyf0" alt=""><figcaption></figcaption></figure>
2. Paste in the Measurement ID in the **Measurement ID** input field.<br>

   <figure><img src="/files/PEtnmIUI9fh6ix3U0TDL" alt=""><figcaption></figcaption></figure>
3. In the `<head>` section of this page, paste the tracking code.
4. Modify the code by adding `data-cookieconsent="analytics"` to the script tag if you're using a cookie consent solution. The updated tag should look like this:<br>

   <figure><img src="/files/wLi78VxURInq9OeWSNgR" alt=""><figcaption><p><strong>Note</strong>: Replace <code>YOUR_MEASUREMENT_ID</code> with the actual Measurement ID you copied in Step 3.</p></figcaption></figure>
5. Save and publish your changes.

***

### Enabling User-ID in Google Analytics 4

To accurately track user interactions across different devices and sessions, you can enable **User-ID** in Google Analytics 4. This feature allows you to gain deeper insights by associating multiple events and sessions with a unique, persistent ID for each user.\ <br>

<figure><img src="/files/VdkWqDgDVGTK5EZgRy4D" alt=""><figcaption></figcaption></figure>

\
**IMPORTANT**: Before implementing User-ID on your website, you **must first enable User-ID** in your GA4 account settings. Without enabling it, User-ID tracking will not function as intended.

***

### **Important: GDPR Compliance**

If you are implementing Google Analytics, you **must ensure compliance with EU GDPR laws**.&#x20;

This means that **you are required to implement a** [**cookie management solution**](/analytics/cookie-management) to inform users and obtain their consent for data collection.

To comply:

* Use a cookie consent management tool that allows users to accept or reject cookies.
* Ensure that analytics tracking only activates after the user has given explicit consent.
* Clearly communicate in your privacy policy how Google Analytics is used and what data is collected.

Due to these regulations and the requirement for cookie consent, **your Google Analytics data may not be fully accurate**. Find out more about [types of cookie](/analytics/cookie-management#types-of-cookies) and how [acceptance rates](/analytics/cookie-management#acceptance-rates) affect website analytics.&#x20;

Note that the hub [dashboard](/analytics/dashboard) provides some information about [page views](/analytics/page-views) and [overall hub activity](/analytics/dashboard). This is GDPR compliant, as rather than tracking the user, we are analysing the pages themselves instead and, where applicable, have anonymised the data.


# Cookie Management

## Types of cookies

Cookie management is an integral part of privacy compliance. It gives individual website users control over what level of tracking they are comfortable to enable during their time on your site.&#x20;

Consent is collected using a pop-up box or banner that alerts the website visitor the first time they visit the site.&#x20;

<figure><img src="/files/h5je8MKSfW4Ns2rHYdDs" alt=""><figcaption></figcaption></figure>

The types of cookies are categorised as:

| **Necessary** **and** **essential** are functional cookies help make a website usable by enabling basic functions like page navigation, access to secure areas of the website and enabling the use of a service you have explicitly requested. The website cannot function properly without these cookies. |
| ---------------------------------------------------------------------------------------------------------------------------------------------------------------------------------------------------------------------------------------------------------------------------------------------------------- |
| **Analytical** cookies help website owners to understand how visitors interact with websites by collecting and reporting information anonymously. Those cookies are used exclusively for statistical purposes.                                                                                             |

## Acceptance rates

Web analytics tools, such as [Google Analytics](/analytics/google-analytics), may only collect behavioural data from visitors that have given permission for analytical cookies to be stored during their visit.&#x20;

This acceptance rate varies by industry and jurisdiction, but can dramatically affect website analytics.&#x20;

In the case that the user only accepts necessary/essential cookies, their activity will be omitted.&#x20;

Note that the hub [dashboard](/analytics/dashboard) provides some information about [page views](/analytics/page-views) and [overall hub activity](/analytics/dashboard).&#x20;

This is GDPR compliant, as rather than tracking the user, we are analysing the pages themselves instead and, where applicable, have anonymised the data.

## Cookie management

Wavecast's recommended cookie management solution is provided by Openli.&#x20;

Once installed, the solution helps clients remain compliant with GDPR and ePrivacy Directive, even as privacy regulations continue to evolve.&#x20;

Some of the other reasons Openli is recommended:

* **Localisation as standard.** Cookie laws can vary from country to country. Openli adapts the consent widget to ensure compliance with the legal framework of where the user is accessing the site.&#x20;
* **Automatic updates for new cookies.** Rather than having to maintain a static document, Openli auto-updates when new cookies are added to your website. It's especially important for us as a publishing platform because it can be a nightmare to keep track of cookies manually. Any time you embed a third party widget or iframe, a whole load of new cookies can be added onto your site. That's why automated updates are best.&#x20;
* **Compliance with the latest laws.** Put simply, when the law changes so does the policy meaning you are always compliant.&#x20;
* **No shady UX tactics.** Your users have an easy way to toggle cookies on and off, providing them with the option to accept or reject cookies by purpose.&#x20;
* **It makes consent audits a breeze.** Openli also makes sure you can prove you have collected the right consent, a requirement of GDPR, ePrivacy directive and local interpretations of the law. It means that if you ever need to provide an audit of individual consent, we have it covered.&#x20;

## Essential cookies

Wavecast maintains a list of essential cookies that ensure the functionality of each hub.&#x20;

<table><thead><tr><th width="143">Classification</th><th width="160">Name</th><th width="153">Provider</th><th width="247">Purpose</th><th width="139">Expiry</th><th>Type</th></tr></thead><tbody><tr><td>Necessary</td><td>CookieConsent</td><td>Openli</td><td>Stores the user's cookie consent state for the current domain</td><td>1 year</td><td>HTTP Cookie</td></tr><tr><td>Necessary</td><td>debug</td><td>Amazon</td><td>Required as part of Amazon web services. Allows correct delivery of content.</td><td>Persistent</td><td>HTML Local Storage</td></tr><tr><td>Necessary</td><td>jwplayer.bandwidthEstimate</td><td><a href="http://jplayer.org">jplayer.org</a></td><td>Estimates user bandwidth to provide most appropriate video stream quality to the live player</td><td>Session</td><td>HTTP Cookie</td></tr><tr><td>Necessary</td><td>jwplayer.mute</td><td><a href="http://jplayer.org">jplayer.org</a></td><td>Tracks mute/ unmute state of live video player</td><td>Session</td><td>HTTP Cookie</td></tr><tr><td>Necessary</td><td>jwplayer.qualityLabel</td><td><a href="http://jplayer.org">jplayer.org</a></td><td>Allows user to manually select live player video quality</td><td>Session</td><td>HTTP Cookie</td></tr><tr><td>Necessary</td><td>jwplayer.volume</td><td><a href="http://jplayer.org">jplayer.org</a></td><td>Allows user to chose volume level</td><td>Session</td><td>HTTP Cookie</td></tr><tr><td>Necessary</td><td>jwplayerLocalId</td><td><a href="http://jplayer.org">jplayer.org</a></td><td>Jplayer video player local daemon.</td><td>Session</td><td>HTTP Cookie</td></tr><tr><td>Necessary</td><td>on_auth_redirect_to_492</td><td><a href="http://wavecast.io">wavecast.io</a></td><td>Used to redirect the user to the approriate page after sign up/sign in.</td><td>1 day</td><td>HTTP Cookie</td></tr><tr><td>Necessary</td><td>pap_session</td><td><a href="http://wavecast.io">wavecast.io</a></td><td>Authentication - We need to set cookies for the session to allow users to access the content and any other account based functions. Content cannot be protected without these cookies and it is critical for site functioning.</td><td>1 day</td><td>HTTP Cookie</td></tr><tr><td>Necessary</td><td>pap_wcaid_492</td><td><a href="http://wavecast.io">wavecast.io</a></td><td>Critical for site functioning and engagement reporting -These cookies are used for user tracking.</td><td>5 days</td><td>HTTP Cookie</td></tr><tr><td>Necessary</td><td>pusherTransportEncrypted</td><td><a href="http://wavecast.io">wavecast.io</a></td><td>Websockets connection. Required for real time updates (e.g. live feed comments)</td><td>Persistent</td><td>HTML Local Storage</td></tr><tr><td>Necessary</td><td>src_492_referer_host</td><td><a href="http://wavecast.io">wavecast.io</a></td><td>Critical for site functioning and engagement reporting. These cookies are used for user tracking.</td><td>6 days</td><td>HTTP Cookie</td></tr><tr><td>Necessary</td><td>src_492_referer_path</td><td><a href="http://wavecast.io">wavecast.io</a></td><td>Critical for site functioning and engagement reporting. These cookies are used for user tracking.</td><td>6 days</td><td>HTTP Cookie</td></tr><tr><td>Necessary</td><td>undefined</td><td>Wistia</td><td>Wistia is a video hosting platform and is used to deliver video content. Collects data on visitor interaction with the website's video-content.</td><td>Persistent</td><td>HTML Local Storage</td></tr><tr><td>Necessary</td><td>XSRF-TOKEN</td><td><a href="http://wavecast.io">wavecast.io</a></td><td>Ensures visitor browsing-security by preventing cross-site request forgery. This cookie is essential for the security of the website and visitor.</td><td>1 day</td><td>HTTP Cookie</td></tr><tr><td>Analytical</td><td>_ga</td><td>Google</td><td>Registers a unique ID that is used to generate statistical data on how the visitor uses the website.</td><td>2 years</td><td>HTTP Cookie</td></tr><tr><td>Analytical</td><td>_ga_#</td><td>Google</td><td>Used by Google Analytics to collect data on the number of times a user has visited the website as well as dates for the first and most recent visit.</td><td>2 years</td><td>HTTP Cookie</td></tr></tbody></table>

This list may vary once integrations, embed codes and plugins are added.&#x20;

## How to install

Request cookie management is installed on your hub through Wavecast technical support. Our install service includes:

* Openli setup and configuration under our Wavecast Partner license.
* The software scans your website regularly to identify and classify cookies.
* Customise the pop-up box to feature your primary hub colour.&#x20;
* Maintain user consents should you ever require them for data protection audits.
* We're on hand with standard Wavecast technical support.


# Page Views

{% hint style="info" %}
There is limited information on this page whilst we upgrade our analytics to make them more user-friendly and actionable. [Contact support](/#contact-support) for further assistance.&#x20;
{% endhint %}

Due to these regulations and the requirement for cookie consent, **your Google Analytics data may not be fully accurate**. We have observed that acceptance rates for cookies can be as low as 3% in some cases, meaning a significant portion of user activity may not be tracked. This limitation is important to consider when analyzing site data, as it may not fully represent the total traffic and user behavior.

We have managed to expose our necessary cookies, so you can get a more accurate idea of idea of your page views. For more information on GDPR Rules and Regulations, please go [here](https://docs.wavecast.io/analytics/google-analytics#important-gdpr-compliance).&#x20;

## Dashboard > Page Views

Select Dashboard > Page Views from the navigation.&#x20;

You can filter by the following:

* Date Range
* Content Types
* Content IDs

<figure><img src="/files/BOxhrsdEkojj3xT5NNbs" alt=""><figcaption></figcaption></figure>

***

In the listing, you'll find the Title, Content ID, Content Type, Total Views (both for each article and overall), and Unique Views (summarized for each article along with the count of unique viewers).

You can access more in-depth analysis of each article by clicking the chart button.&#x20;

Alternatively, you can go and edit each content by clicking on the edit button.&#x20;

<figure><img src="/files/CJBxf1RA4iu7TJKkwzE6" alt=""><figcaption></figcaption></figure>


# User Data

The Audience > User page provides comprehensive insights into users registered to the hub, allowing you to perform in-depth analysis of user behavior and engagement. Here, you can access detailed information about each user, including their activity within the hub, account status, and associated data fields.

<figure><img src="/files/Fy6xUapLPlVlewQIvjFR" alt=""><figcaption></figcaption></figure>

{% hint style="info" %}
&#x20;This page features an **auto-login link** for users. For further information on this, please read [this documentation](/live/troubleshooting-for-audiences#can-you-send-me-my-auto-login-link).
{% endhint %}

***

### Filtering

<figure><img src="/files/3mgmhsEtyTKyqGn2M2sV" alt=""><figcaption></figcaption></figure>

The **Filtering** function allows you to filtering via the following parameters:

* Account type (Team Members or Subscribers)
* Account status (Passive or Active)
* Registrants for specific events, documents, etc.
* Personal details (Name, Job Title, Company, ID, etc.)
* Term subscriptions
* Areas of interest
* Email list memberships
* Download history
* Geographic information
* Account creation date range
* Additional criteria available under Advanced Search

### Exporting

<figure><img src="/files/f3Ws6lXfT2NTcD1jituJ" alt=""><figcaption></figcaption></figure>

The **Export** function allows you to download the following information:

* All available sign-up fields
* Any third-party User ID (User Token)
* Account status (passive or activated)
* SSO Groups associated with the account
* UTM parameters (Source, Medium, Campaign, Term, Content). \
  NOTE: that if you have a cookie consent solution in place, these fields will only be populated for users who have consented to analytical cookies. For more details, [please refer to the documentation](https://docs.wavecast.io/analytics/google-analytics#important-gdpr-compliance).
* Referrer host and path
* Source information
* Paywall source content
* Registration date
* Any reference number
* Networking access status and whether the user has opted out of the networking area
* User responses to the Terms & Conditions
* Requests to not sync data with any third parties
* Any additional fields, such as [custom fields for event sign-ups](https://docs.wavecast.io/publishing/control-access/extra-fields-for-content) or [third-party opt-in consent](https://docs.wavecast.io/publishing/control-access/managing-opt-ins)

{% embed url="<https://scribehow.com/embed/Export_Networking_Settings_for_Users_on_an_Event-by-Event_Basis__IcH0-xq5RmenyN4JhDE70g>" %}

{% hint style="info" %}
To see what you are displaying on your sign-up fields, please look at [this documention](/settings/access-control).&#x20;
{% endhint %}


# Guest Passes

Coming soon!

You can access a hub-wide guest pass report by going to Dashboard > Guest Passes.<br>

<figure><img src="/files/sfKGP1FD8qB4CJDqRc2x" alt=""><figcaption></figcaption></figure>

You can filter by event, sponsor, admin status, and more. Additionally, you can export guest pass reports. To access event-specific guest pass lists, click the button at the end of each row. (Note: This filters the guest list based on the email address provided.)

<figure><img src="/files/qq13YKUnzWTCXYTne8ss" alt=""><figcaption></figcaption></figure>


# Configuration

## Setup & Configuration&#x20;

These guides contain all the step-by-step instructions you need to successfully configure your Wavecast hub.&#x20;

This is the best place to understand how to control:&#x20;

* The visual identity of the hub&#x20;
* The sign-up and sign-in experience&#x20;
* Advanced customisation of web and email domains&#x20;
* Privacy and analytics&#x20;
* Global settings for events and networking


# Fonts, Colours & Logos

## Fonts

{% embed url="<https://scribehow.com/shared/Add_custom_font_to_a_hub__WfraXDsyQISmv5sO6yh5RQ?referrer=documents>" %}

## Colours

{% embed url="<https://scribehow.com/shared/Update_default_hub_colours__qufRXxPFQtOnN5zCElZLKg?referrer=documents>" %}

## Logos & Favicons

{% embed url="<https://scribehow.com/shared/Update_a_hub_logo_or_favicon__ZElqUWWXSKWbTyfEs1eMJg>" %}


# Hub Header & Footer

## Update the hub header

{% embed url="<https://scribehow.com/shared/Update_the_hub_header__YKKaT3y4TyKTuoAiqCWhWw>" %}

## Update the hub footer

{% embed url="<https://scribehow.com/shared/Update_the_hub_footer__NsljnOEUSkuNpmgX1etZmA>" %}


# Custom Domain

Set up a custom domain or subdomain for your hub

| Supported custom domain type | Example               |
| ---------------------------- | --------------------- |
| `www` subdomain              | `www.example.com`     |
| Custom subdomain             | `event-x.example.com` |
| Apex domain                  | `example.com`         |

## Subdomain

It's straightforward to set up a custom subdomain for your hub such as **[www.example.com](http://www.example.com)** or **eventx.mydomain.com** by setting a CNAME record with your DNS provider and submitting an email request to c[lients@wavecastpro.com](mailto:clients@wavecastpro.com?subject=New+Custom+Domain+Request).&#x20;

DNS changes take a few minutes to implement but can take up to 24 hours to propagate across the internet. If your domain is already in use, please inform us to avoid any downtime.&#x20;

Set the CNAME record for your subdomain in the DNS settings and point it to dns1.wavecast.io.

## Apexdomain

Please consider your apex domain.&#x20;

An Apex domain is a root domain that does not contain a subdomain. They are also known as base, bare, naked, root apex, or zone apex domains.

* [example.com](http://example.com/) is an apex domain because it does not have a subdomain
* [www.example.com](http://www.example.com/) is NOT an apex domain because it contains the subdomain part [www](http://www).

If your Apex domain is not set, a user may type in your domain without the [www](http://www). and fail to find your site.&#x20;

Set an ALIAS for your apex domain in the DNS and point it to **dns1.wavecast.io**

If your domain registrar does not support ALIAS create an A record instead.

| Scenario                                                                                 | DNS record type    | DNS record name                                            | DNS record value(s) |
| ---------------------------------------------------------------------------------------- | ------------------ | ---------------------------------------------------------- | ------------------- |
| <p>Apex domain<br>(<code>example.com</code>)</p>                                         | `A`                | `@`                                                        | `209.38.176.207`    |
| <p>Apex domain<br>(<code>example.com</code>)</p>                                         | `ALIAS` or `ANAME` | `@`                                                        | `dns1.wavecast.io`  |
| <p>Subdomain<br>(<code>ww​w\.example.com</code>,<br><code>eventx.example.com</code>)</p> | `CNAME`            | <p><code>www</code></p><p>or</p><p><code>eventx</code></p> | `dns1.wavecast.io`  |

**\*IMPORTANT Notes\***

1. Unless your DNS provider supports **CNAME** flattening, do not create a **CNAME** record for your custom apex domain (unless you really know what you are doing!). It may cause issues with other services, such as email.
2. Papillon servers will manage the redirection from or to your Apex domain and subdomain.&#x20;


# Update GoDaddy DNS

Here are step-by-step instructions on how to set up the DNS records shown in your screenshots using GoDaddy:

***

### **1) Access Your DNS Settings on GoDaddy**

1. Go to <https://godaddy.com> and log in.
2. Click on your name in the top right corner, then go to **"My Products"**.
3. Find your domain and click on it then click the **"DNS"** tab on the page, as shown below.

<figure><img src="/files/JfrmUNP3l8B14gTabpiE" alt=""><figcaption></figcaption></figure>

### **2) Set Up Subdomain (CNAME Record)**

**Example:**

* **Subdomain:** `www.example.com` or `eventx.example.com`
* **Record Type:** `CNAME`
* **Name:** `www` or `eventx`
* **Value:** `dns1.wavecast.io`

**Steps:**

1. Under **Records**, click **"Add"**.
2. Choose **Type**: `CNAME`.
3. **Name**: Type `www` or `eventx` (whatever subdomain you want to use).
4. **Value**: Enter `dns1.wavecast.io`.
5. TTL: Leave as default (`1 hour`).
6. Click **Save**.

### **3) Set Up Apex Domain (A Record)**

This step is only required when setting up the **apex domain**, such as `example.com` or `www.example.com`.\
If you're using a subdomain like `event.example.com`, this step is **not required**.

**Example:**

* **Domain:** `example.com`
* **Record Type:** `A`
* **Name**: `@`
* **Value**: `209.38.176.207`

**Steps:**

1. In the DNS records list, look for an existing **A record** with the **Name** `@`.
   * If it exists, click **Edit**.
   * If it doesn’t, click **"Add"**.
2. Choose **Type**: `A`.
3. **Name**: `@`
4. **Value**: `209.38.176.207`
5. TTL: Leave as default (`1 hour`).
6. Click **Save**.

<figure><img src="/files/gpGWMuZyJJC4Uk90tV40" alt=""><figcaption></figcaption></figure>


---

[Next Page](/llms-full.txt/1)